Tutorial: Dosing and Physiology Schedule
In this tutorial, we will cover:
Creating a new GPX™ project and adding a default compound
A default compound uses all the default compound properties.
Open GPX™ and, in the Dashboard view, click on the icon next to New to create a new project.
Enter a Project Name, for example “Dosing and Physiology Schedules”.
Click Browse to select the desired Project Location folder.
Click to turn on the toggle next to From Template.
Click on the template called S+ Human Template to select this to use.
Click Create.

The name of the project should now be visible in the top right corner of the program.
Navigate to the Compounds view.
Click Add and enter the name of the compound – we are going to use the default compound properties for this tutorial and so you can name the compound as “Example Compound”, then click OK.
Save the project.
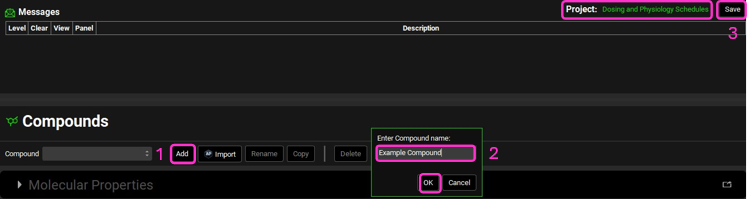
NB – numbers reflect the order of the steps in the screenshot, rather than corresponding to the steps in the tutorial.
Creating two Dosing Schedules
A: to dose a 1mg 0.5h IV Infusion followed by a 100mg PO Tablet BID for 7 days.
B: to dose a 100mg PO Tablet BID for 7 days.
Navigate to the Dosing view.
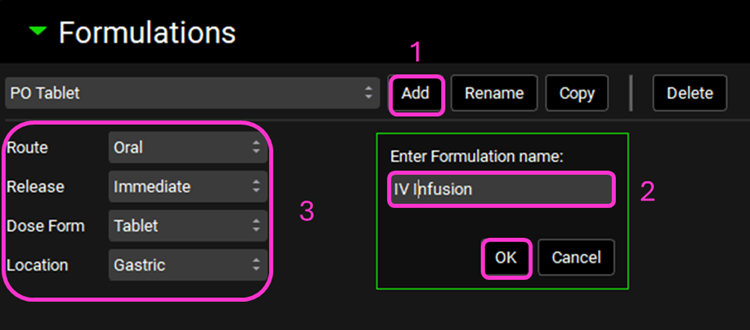
The template comes with an oral tablet formulation already loaded, expand the Formulations panel (by clicking on the green arrow or double clicking on the Formulations panel) to view the formulation asset “PO Tablet”.
Click Add and type “IV Infusion” in the Enter Formulation name dialog box, then click OK. Update the Route and Dose Form options to “IntraVenous” and “Infusion”, respectively by clicking in each box to access the drop-down list.
Minimize the Formulations panel.
Expand the Dosing Schedules panel and observe the “100mg tablet” dosing schedule that comes with the template.
Click Add and type “1mg Infusion Loading 100mg BID tablet” as the Dosing Schedule name then click OK.
Click Add Dose Administration at the bottom of the Dosing Schedule table.
Select IV Infusion in the first row as the Formulation (the Formulation will likely default to PO Tablet in every row).
Update the Amount (mg) to dose 1mg for the IV Infusion and 100mg for the PO Tablet.
Leave the Dose Volume (mL) as the default 250mL.
Confirm that the Infusion will Start at 0h and the Tablet will be dosed at 1h.
Set the Infusion Duration to 0.5h.
On the PO tablet row, change the Administration Interval to 12h and the Administrations to 14.

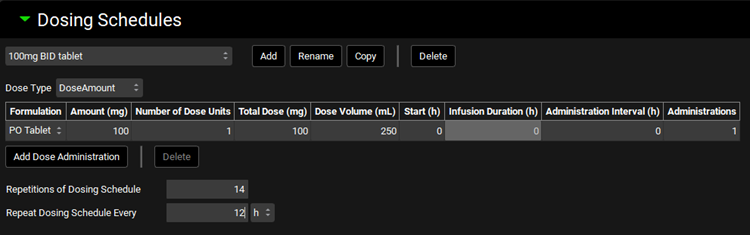
To create the second Dosing Schedule, click Add at the top of the panel and type “100mg BID tablet” as the Dosing Schedule name.
If not already selected, select the PO Tablet Formulation. Leave the Dose Volume (mL) as the default 250mL and the Start as the default 0 h.
Set the Repetitions of Dosing Schedule to 14 by clicking in the box and typing the value.
Set the Repeat Dosing Schedule Every to 12 h by clicking in the box and typing the value.
Save the project.
Creating and running Simulations using the different Dosing Schedules
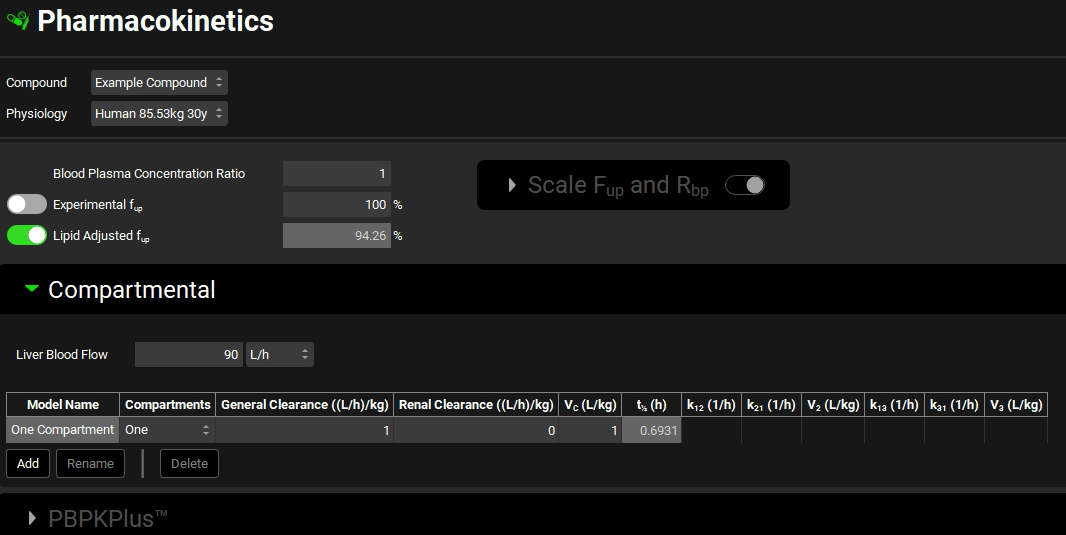
Navigate to the Pharmacokinetics view and expand the Compartmental panel, note the default parameters for Blood Plasma Concentration Ratio, Fup, General Clearance and volume of distribution (Vc). This also creates the link between the compound and the physiomolecular properties.
Navigate to the Simulations view and create a new simulation using the Add button. Enter “IV Infusion Loading plus PO Tablet” as the Simulation name and click OK.
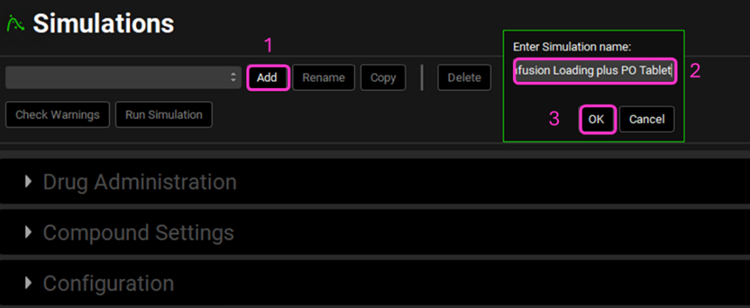
NB – numbers reflect the order of the steps in the screenshot, rather than corresponding to the steps in the tutorial.
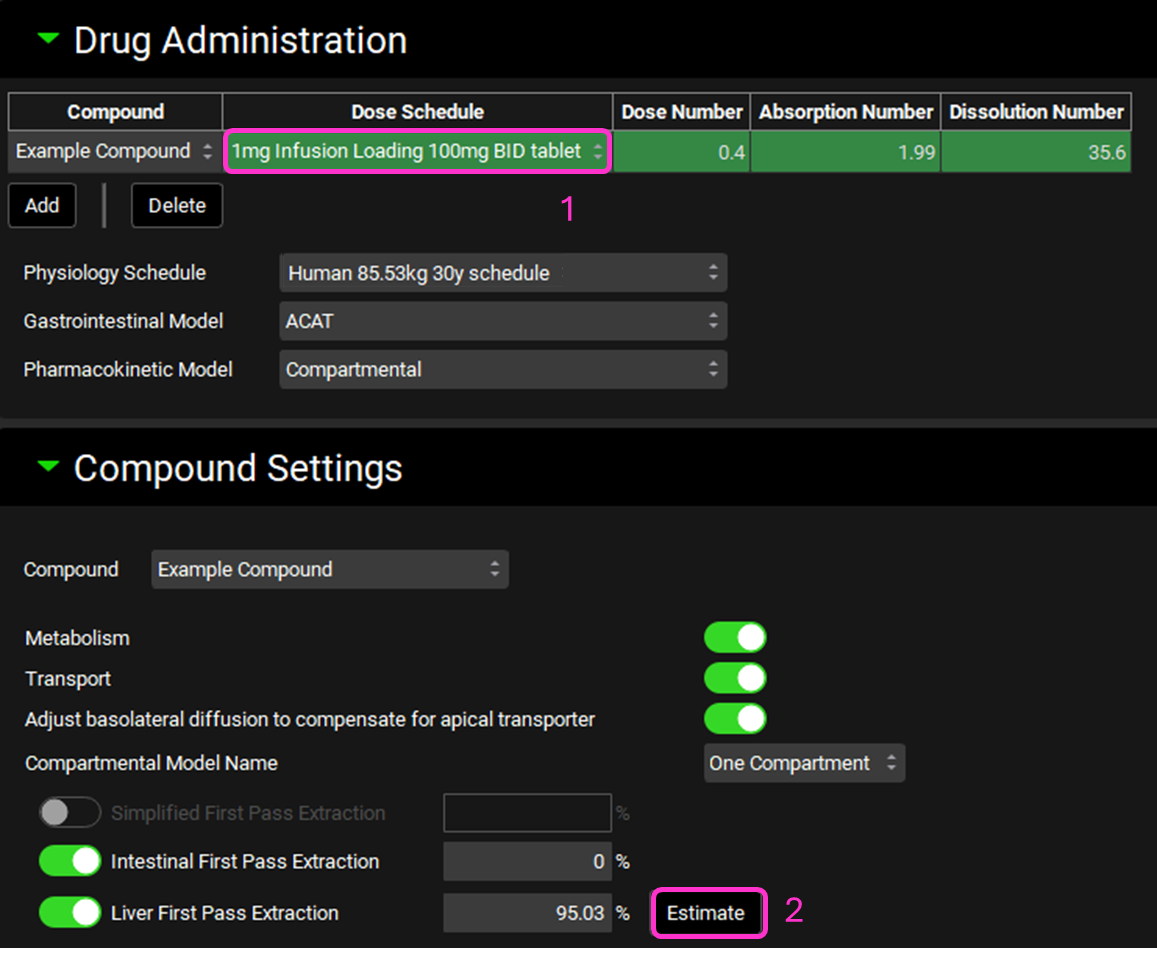
Expand the Drug Administration panel and check that the Example Compound is selected. In the Dose schedule cell, click on the arrows next to the 100mg tablet and select the 1mg Infusion Loading 100mg BID tablet.
Expand the Compound Settings panel to calculate the Liver First Pass Extraction from the compartmental clearance by clicking the Estimate button.
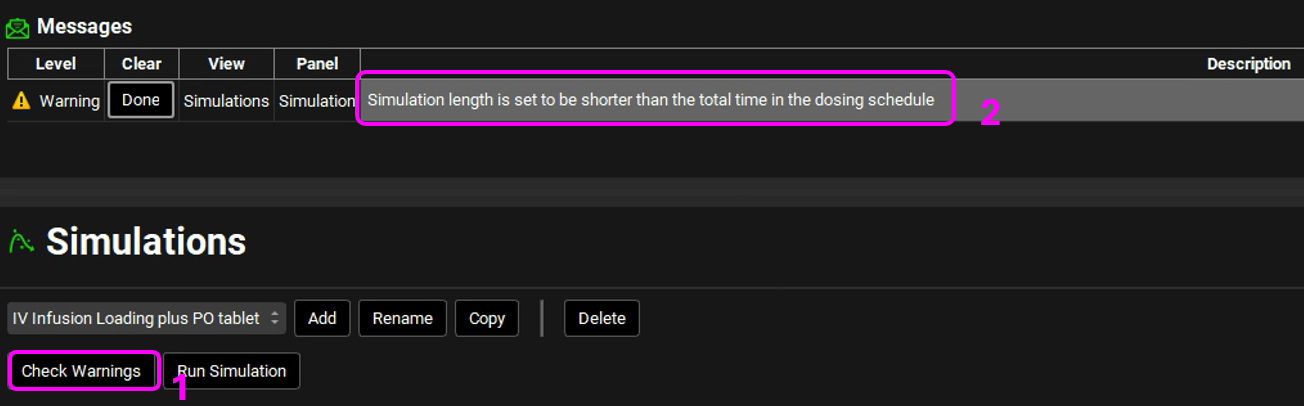
Click the Check Warnings button at the top of the Simulations view.
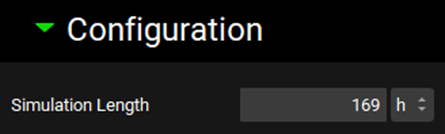
A warning message is displayed in the Messages Center indicating that the Simulation length is shorter than the dosing schedule. To remedy this, scroll down and expand the Configuration panel and enter 169 h as the Simulation Length.
Clear the warning by clicking Done in the Messages Center.
At the top of the Simulations view, copy the Simulation and name it “100mg BID PO Tablet”, click OK, then select 100mg BID tablet as the Dose Schedule. Click the Check Warnings Button.
Save the Project.
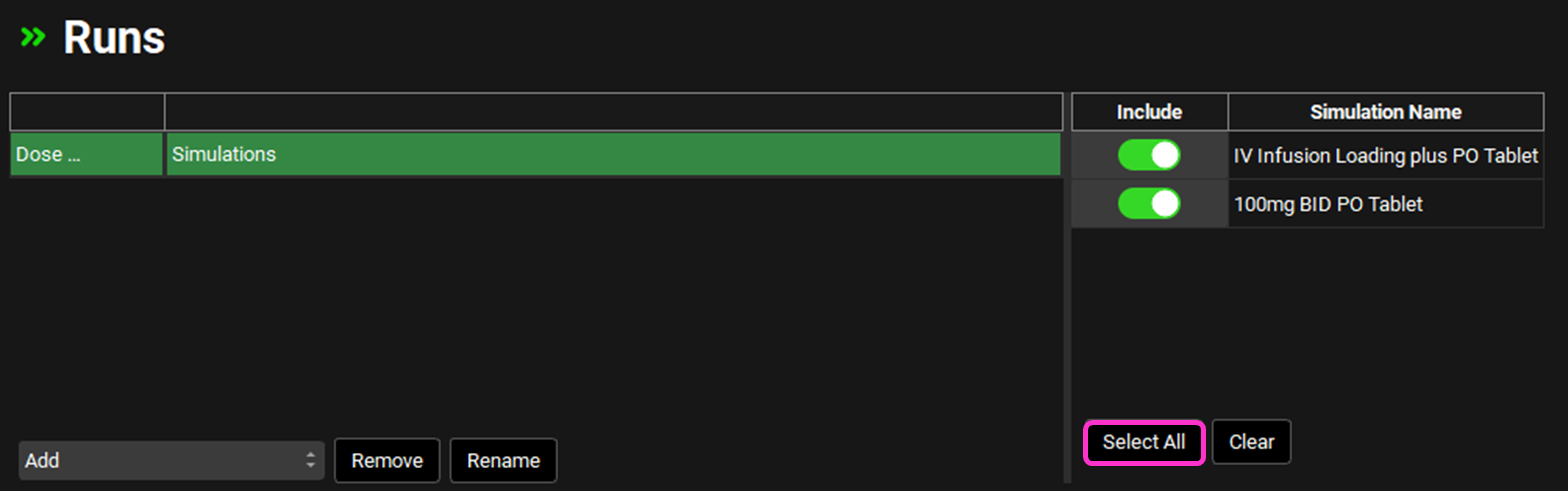
Navigate to the Runs view, click Add, select Simulations from the drop-down, enter “Dose Schedules” as the Run name and click OK.
Click the Select All button at the bottom of the Simulations list on the right-hand side of the interface. Save the project.
Minimize the Output Settings panel and click Start in the Run Controls panel.
When the Run has completed, the program switches automatically to the Analysis view.
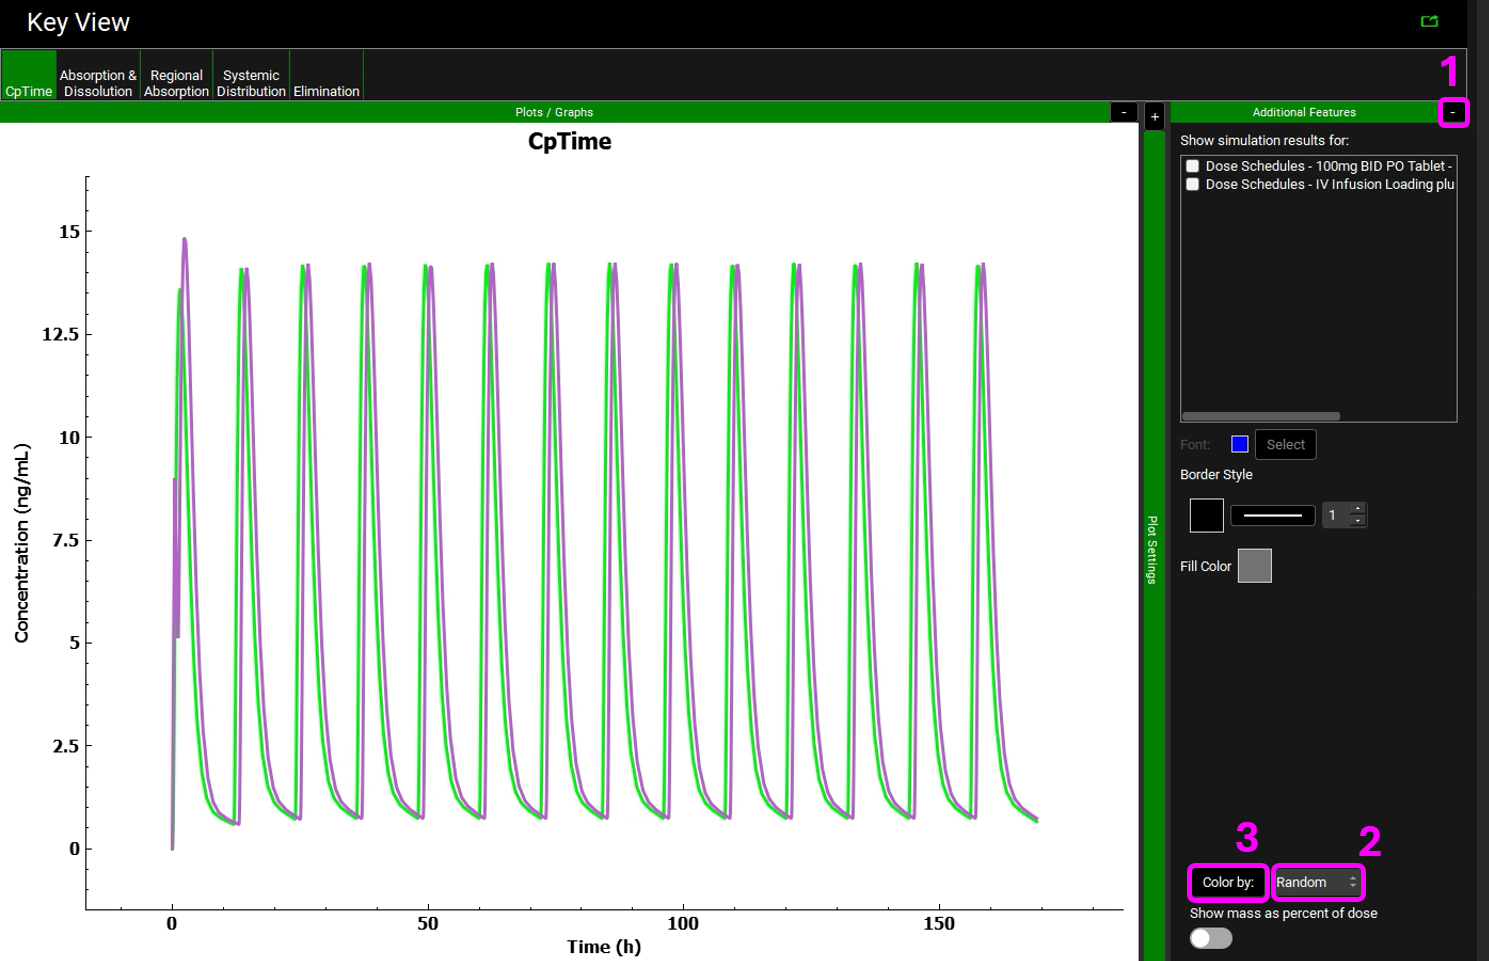
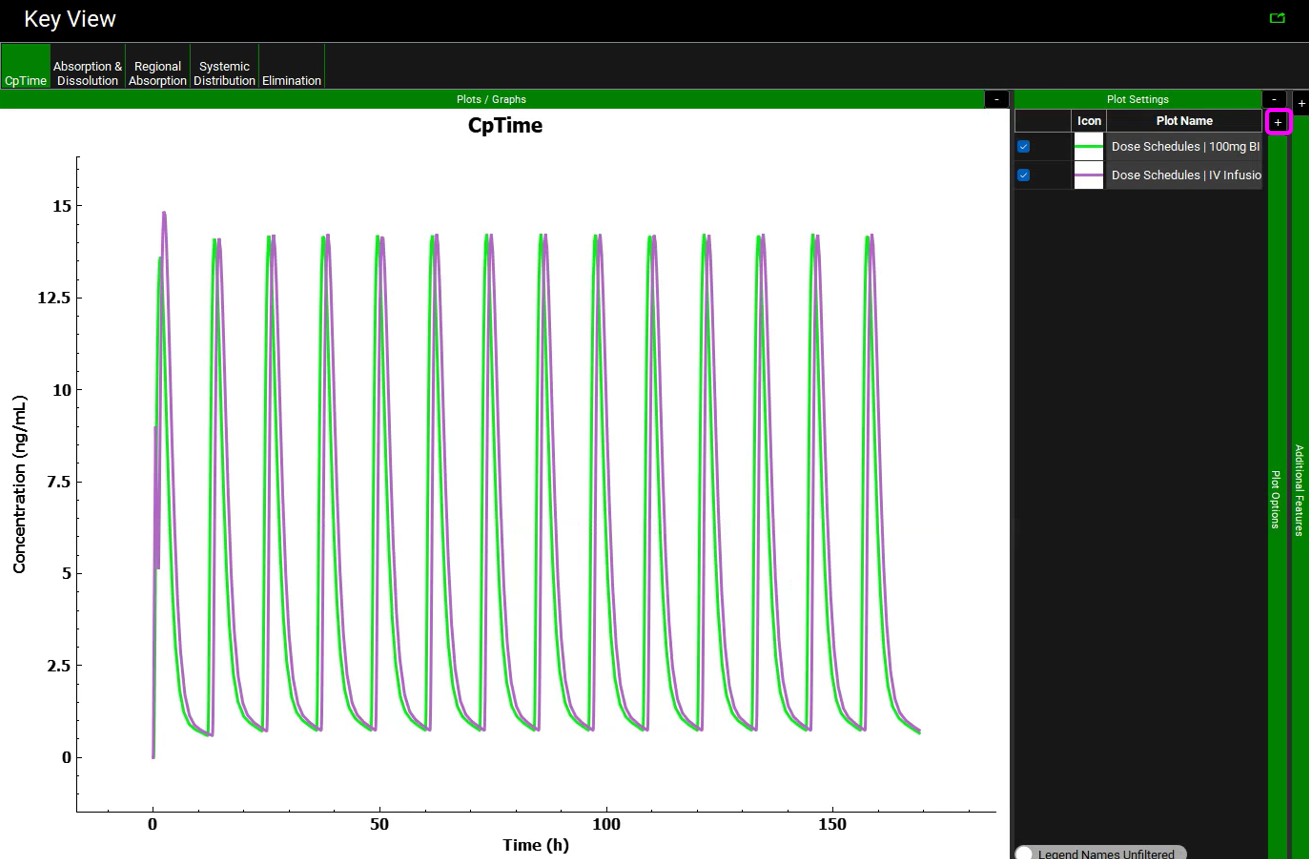
Expand the Additional Features panel by clicking on the “+” at the top of the bar. Click on the box containing “Tissue” to activate the Color by drop-down list. Select “Random” and click the Color by: button to activate this setting in the plot (NB the colors you get may be different to the screenshot – repeatedly clicking the Color by: button cycles through different color options).
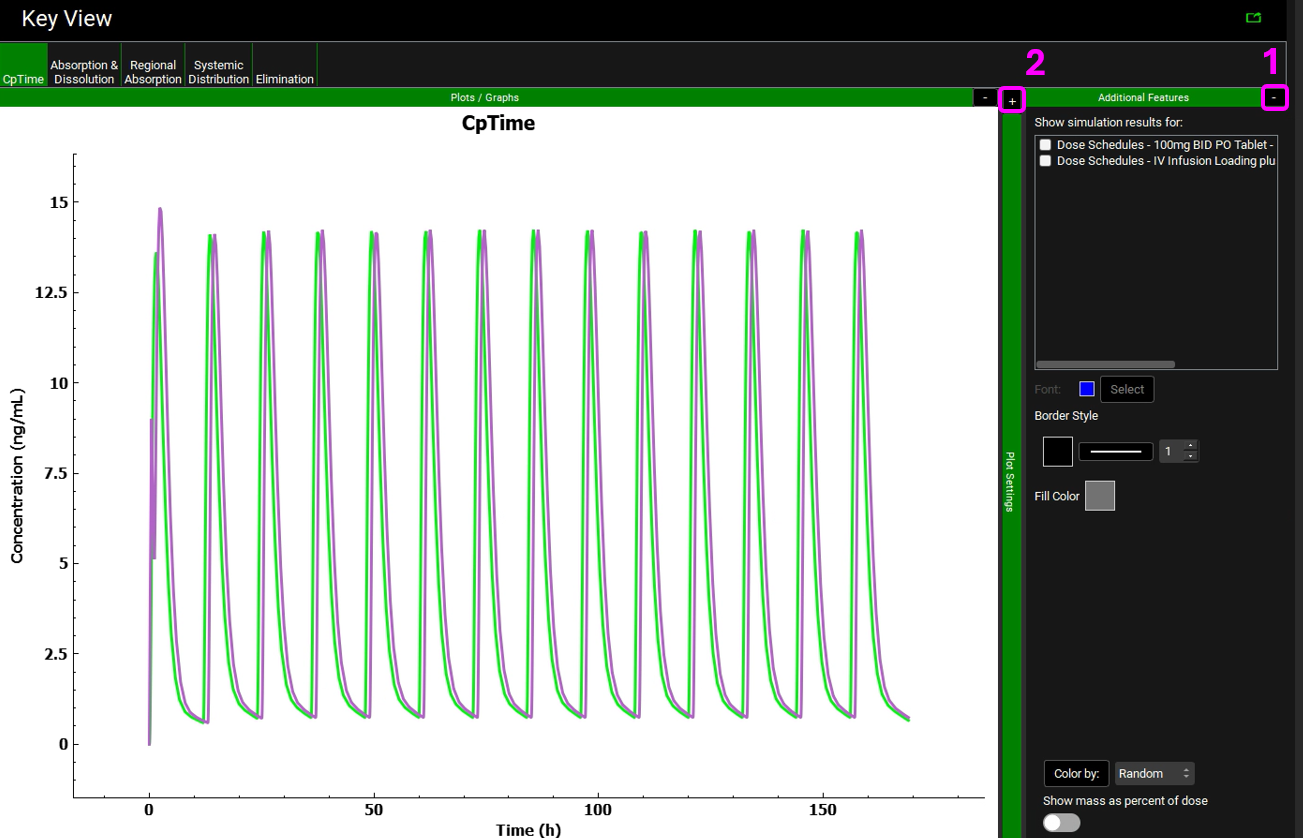
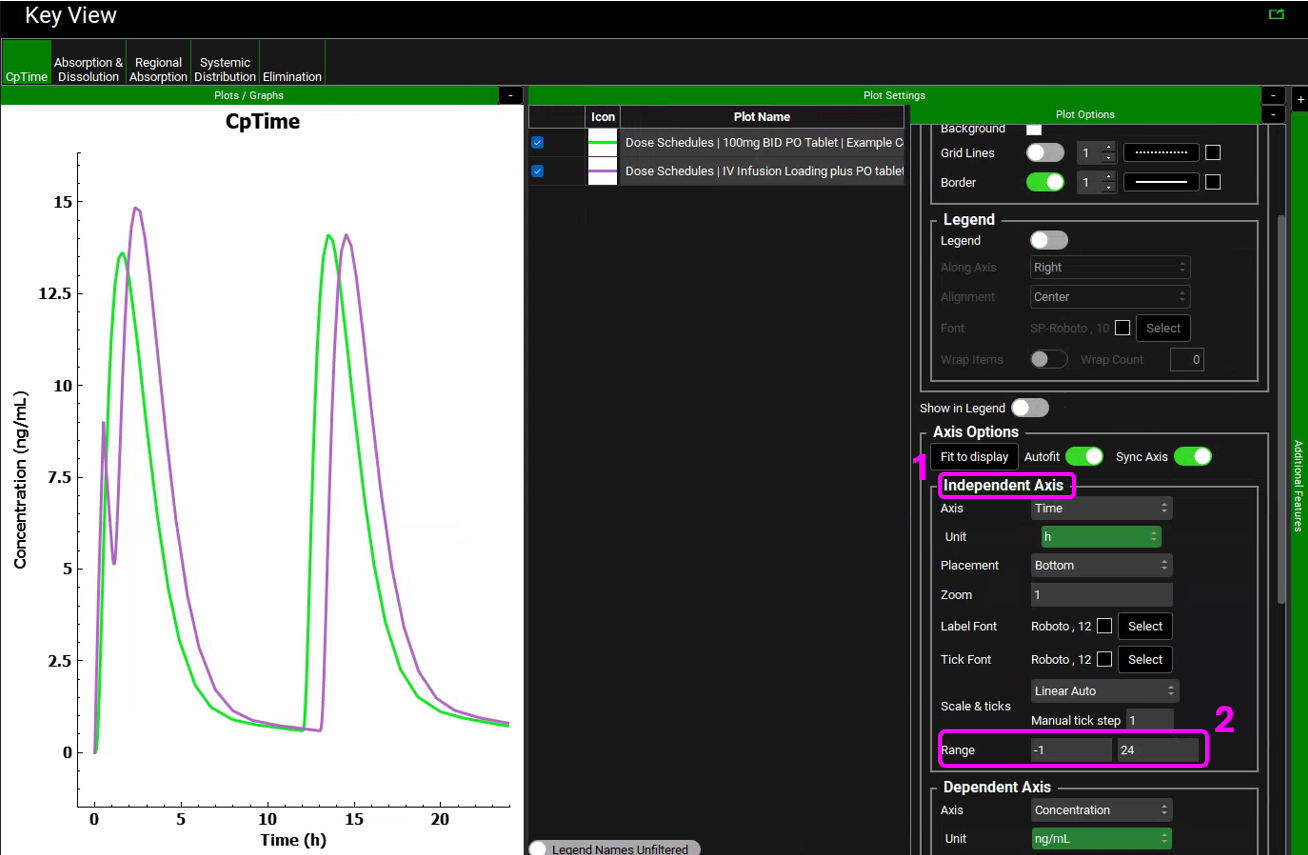
Minimizing the Additional Features by clicking on the “-” and expanding both the Plot Settings and Plot Options by clicking on the “+” enables the Independent Axis range to be adjusted so the first 24 h of the Dosing Schedule can be viewed.
Creating a Physiology Schedule to reflect a regimen
In this tutorial, a Physiology Schedule to reflect the following regimen will be created:
Time (h) | Event |
0 | Dosing in the fasted state |
2 | Low fat, moderate calorie breakfast |
5 | Moderate fat, moderate calorie lunch |
8 | Low fat, low calorie snack |
12 | High fat, high calorie evening meal |
Navigate to the Physiologies view.
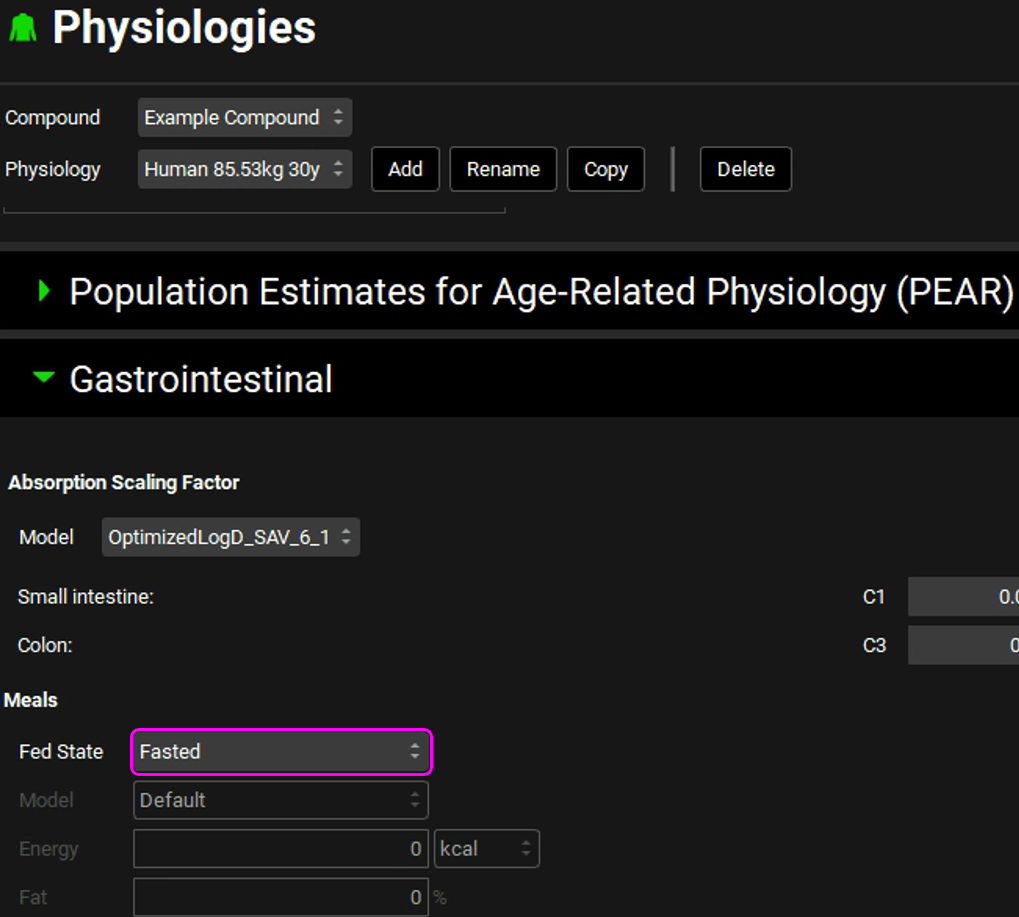
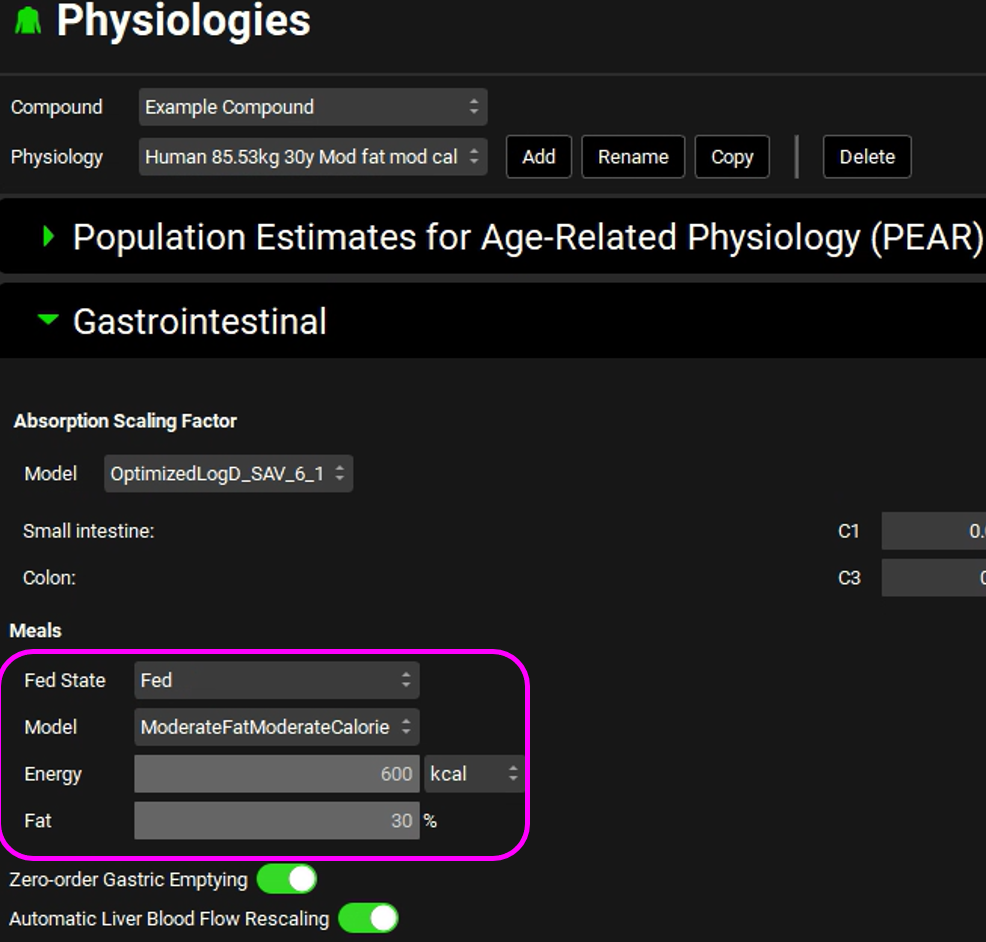
The first step requires physiologies to be created for each meal type. The template comes with a Human 85.53kg American 30 y male physiology (called Human 85.53kg 30y) already loaded. Expanding the Gastrointestinal panel shows that this physiology is in the fasted state.
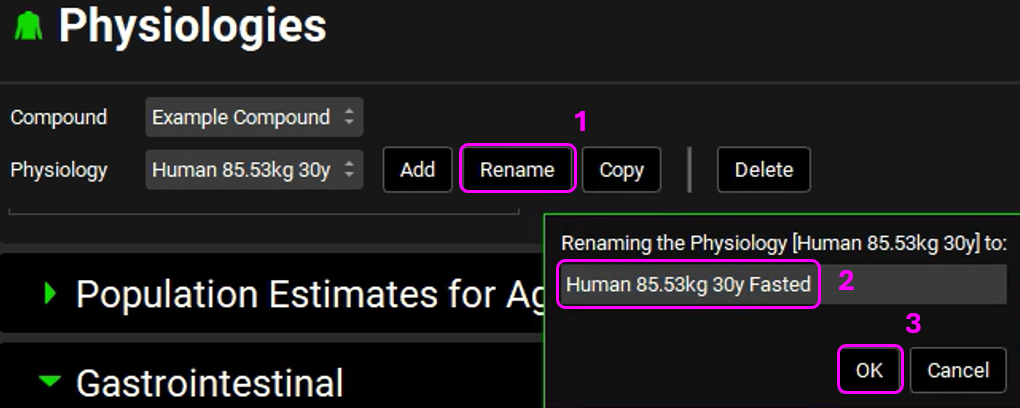
Rename the physiology to indicate this is the fasted state physiology by clicking Rename next to the Physiology name. Add “Fasted” to the end of the name in the Renaming the Physiology dialog box and click OK.
Copy the physiology by clicking Copy next to the Physiology name. Replace “Fasted” with “Mod fat mod cal” and click OK.
Scroll down to the Gastrointestinal panel and navigate to the Fed State box that currently indicates Fasted and access the drop-down list by clicking in the box. Switch the selection to Fed. The Zero-order Gastric Emptying toggle will automatically switch on as that is default for this Fed State.
Navigate to the Model box (under Fed State) that currently indicates Default and access the drop-down list by clicking in the box. Switch the selection to ModerateFatModerateCalorie.
The previously disabled Energy and Fat selectors will display the number of calories and % fat associated with the selected meal type. As reported in the messages center Liver Blood Flow displayed on the Pharmacokinetics view in the Compartmental panel has increased to 120 L/h compared to the fasted state Liver Blood Flow of 90 L/h. If you do not want the Liver Blood Flow to be rescaled, turn off the Automatic Liver Blood Flow Rescaling toggle, located at the bottom of the screenshot below prior to switching to the Fed state.
Repeat steps 4 to 6 for the following inputs:
Physiology name | Meal type |
Human 85.53kg 30y High fat high cal | HighFatHighCalorie |
Human 85.53kg 30y Low fat mod cal | LowFatModerateCalorie |
Human 85.53kg 30y Low fat low cal | LowFatLowCalorie |
Save the project.
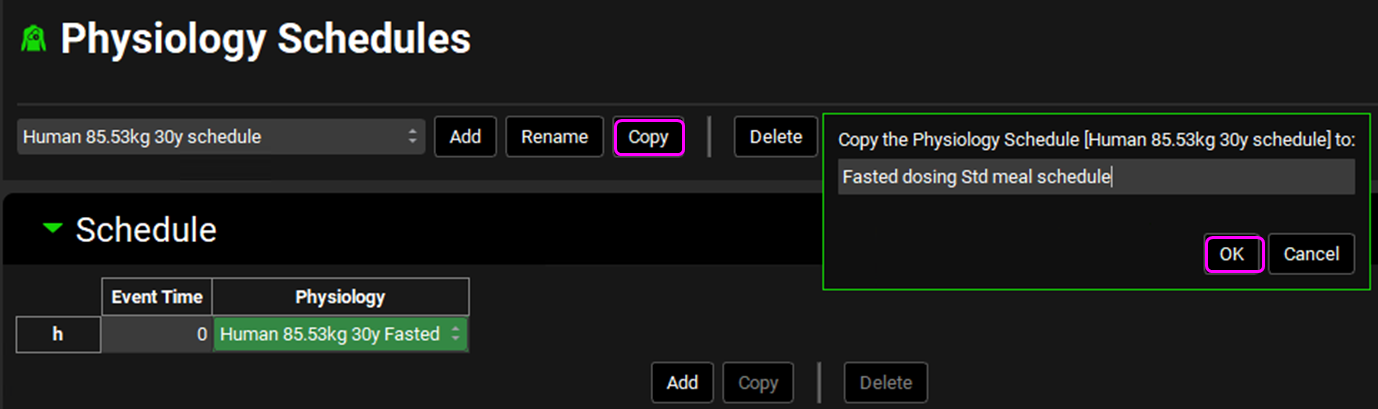
Navigate to the Physiology Schedules view. The program automatically creates a Physiology Schedule for each Physiology that is created. Clicking in the box containing the Physiology Schedule name should display a drop-down list with 5 entries. In each case the Physiology Schedule is set to use that Physiology at Event Time 0.
Copy the Human 85.53kg 30y schedule, name it “Fasted dosing Std meal schedule” and click OK.
Add 4 additional rows to the Schedule table by clicking the Add button 4 times.
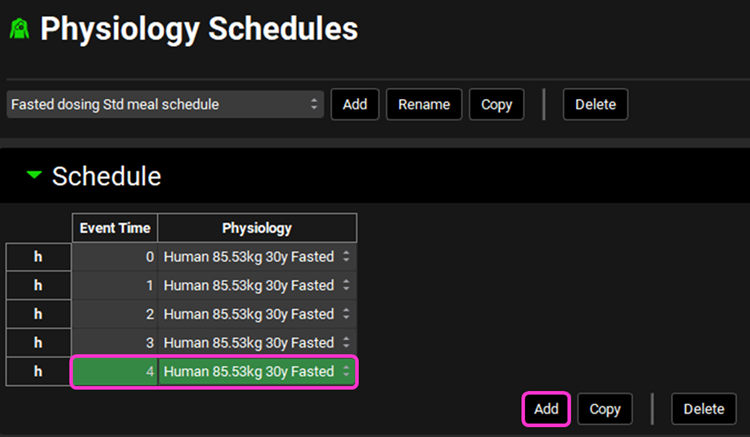
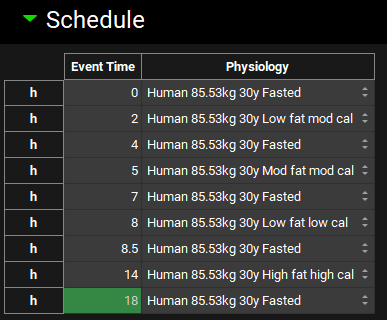
Edit the displayed Event Time and Physiology to reflect the table below. Note that as you change the Event Time the rows will automatically reorder into chronological order so you may wish to work from the bottom up, changing the final row to 14h as the first step.
Event Time (h) | Physiology |
0 | Human 85.53kg 30y Fasted |
2 | Human 85.53kg 30y Low fat mod cal |
5 | Human 85.53kg 30y Mod fat mod cal |
8 | Human 85.53kg 30y Low fat low cal |
14 | Human 85.53kg 30y High fat high cal |
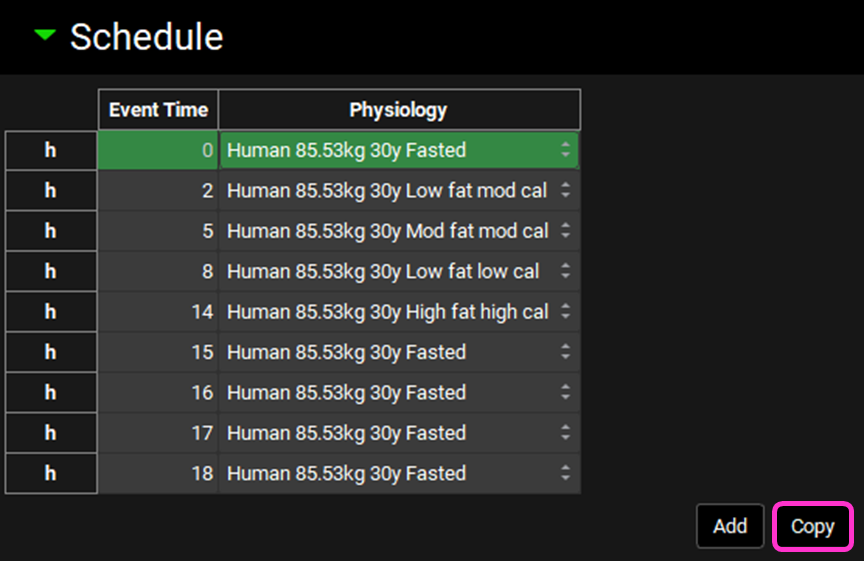
Now we need to add the Events that return the subject to the fasted state post each meal. Hold down CTRL and click the first row in the table to highlight the Event Time 0 row. Click Copy 4 times – 4 rows using the Human 85.53kg 30y Fasted Physiology should be added to the bottom of the table.
Change the Event Times as follows:
Current Event Time (h) | Edited Event Time (h) |
15 | 4 |
16 | 7 |
17 | 8.5 |
18 | 18 |
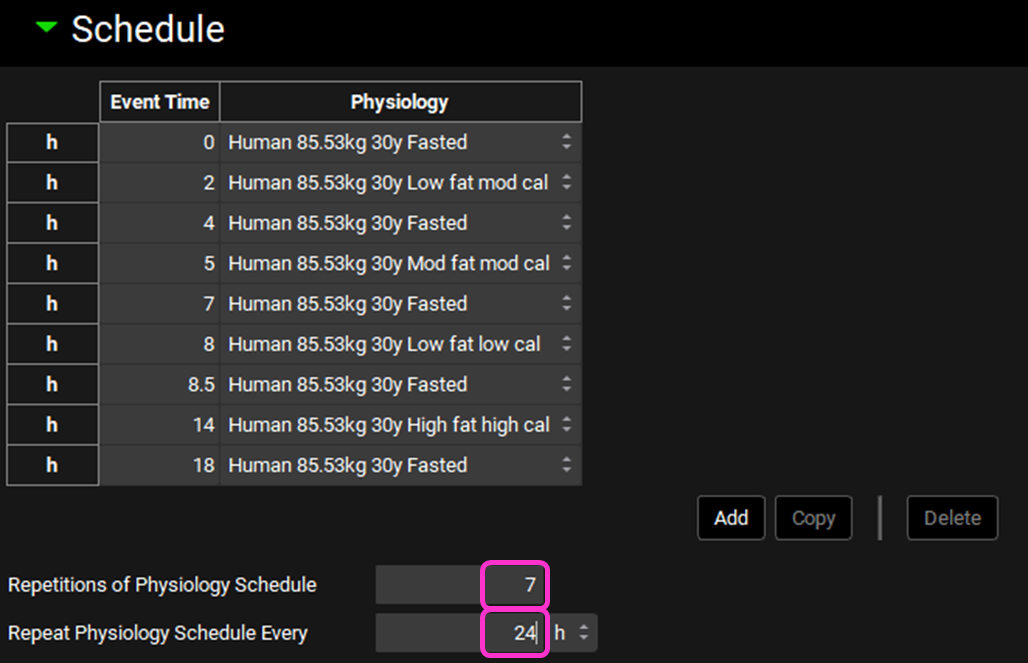
The final Physiology Schedule can be seen below:
We wish to dose for 7 days, therefore update the Repetitions of Physiology Schedule to 7 and Repeat Physiology Schedule Every 24 h
Save the project.
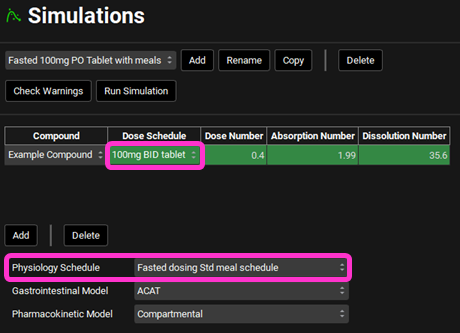
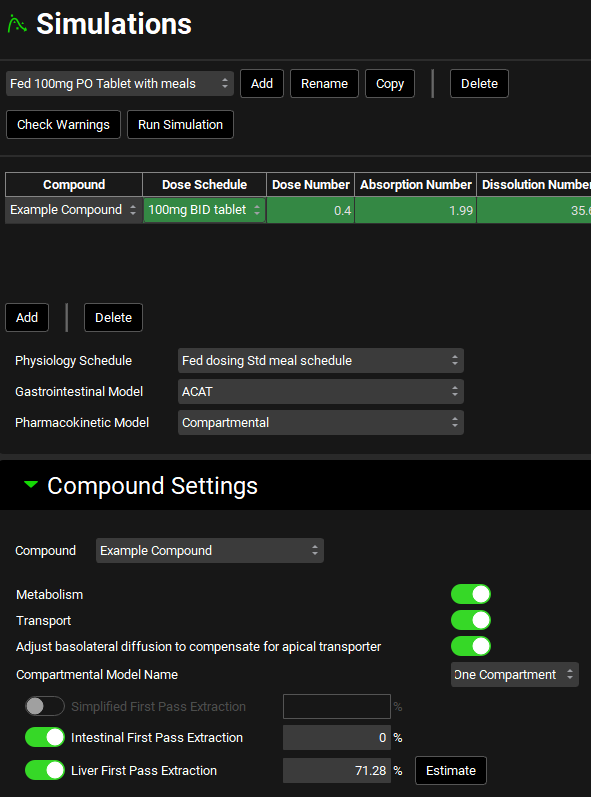
Navigate to the Simulations view and click add to enter a new Simulation. Name the Simulation “Fasted 100mg PO Tablet with meals” and click OK.
In the Drug Administration panel, the “Example Compound” compound asset should be selected since this is the only compound in the project. Select the 100mg BID tablet Dose Schedule asset.
Below the Drug Administration table, select the “Fasted dosing Std meal schedule” from the Physiology Schedule drop-down.
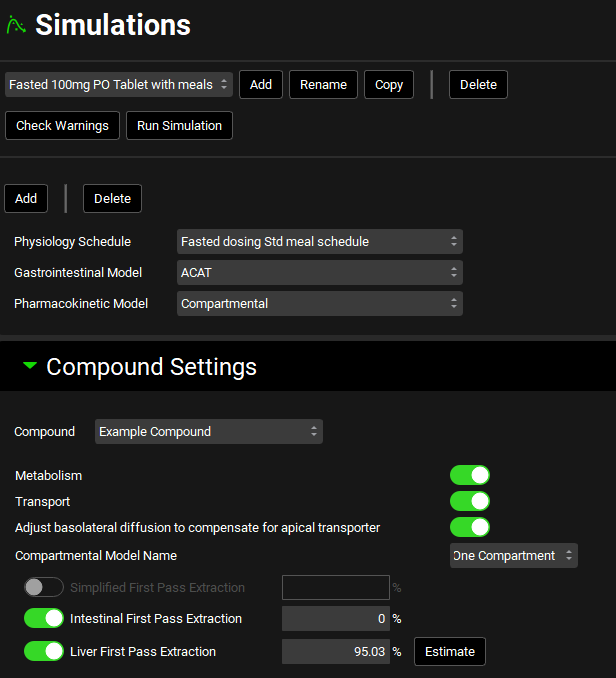
In the Compound Settings panel, click Estimate to calculate the Liver First Pass Extraction.
Clear the message regarding the Physiology Schedule from the Messages Center.
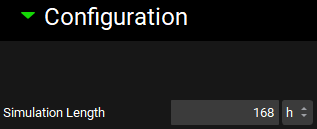
Navigate to the Configuration panel and increase the Simulation Length to 168 h.
Check Warnings and Run the Simulation.
For comparison, let’s create a schedule where dosing occurs in the Fed State with an FDA Breakfast meal. Navigate to the Physiologies view and copy one of the Fed Physiologies. Name the new Physiology “Human 85.53kg 30y FDA breakfast” and click OK.
Change the Fed State Model to “FDABreakfast”.
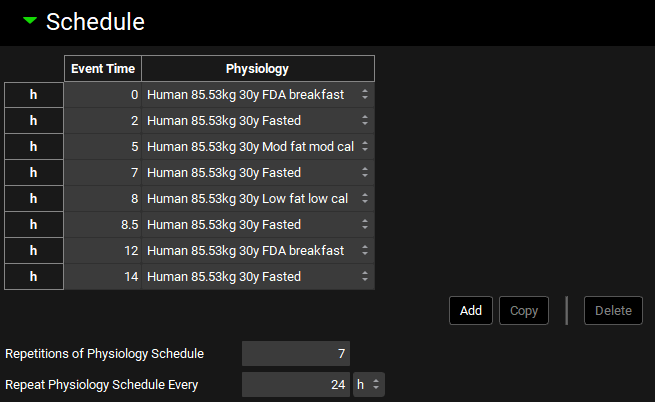
Navigate to the Physiology Schedules view, make sure the “Fasted dosing Std meal schedule” is selected and copy it. Name the new schedule “Fed dosing Std meal schedule” and click OK.
Hold CTRL and click on the 2 h Event Time line to select it. Click Delete to remove this line.
Select the “Human 85.53kg 30y FDA breakfast” Physiology to use at Event Time 0 h.
Edit the 4 h Event Time to 2 h.
Edit the 14 h Event time to 12 h and select the “Human 85.53kg 30y FDA breakfast” Physiology to use.
Edit the 18 h Event time to 14 h.
The final Physiology Schedule can be seen below:
Save the project.
Navigate to the Simulations view.
Ensure the “Fasted 100mg PO Tablet with meals” simulation is selected and Copy this simulation.
Name the new Simulation “Fed 100mg PO Tablet with meals” and click OK.
Select the “Fed dosing Std meal schedule” as the Physiology Schedule in the Drug Administration panel.
Estimate the Liver First Pass Extraction and then clear the warning message from the Messages Center by clicking Done.
Save the project.
Click Check Warnings and then click Run Simulation.
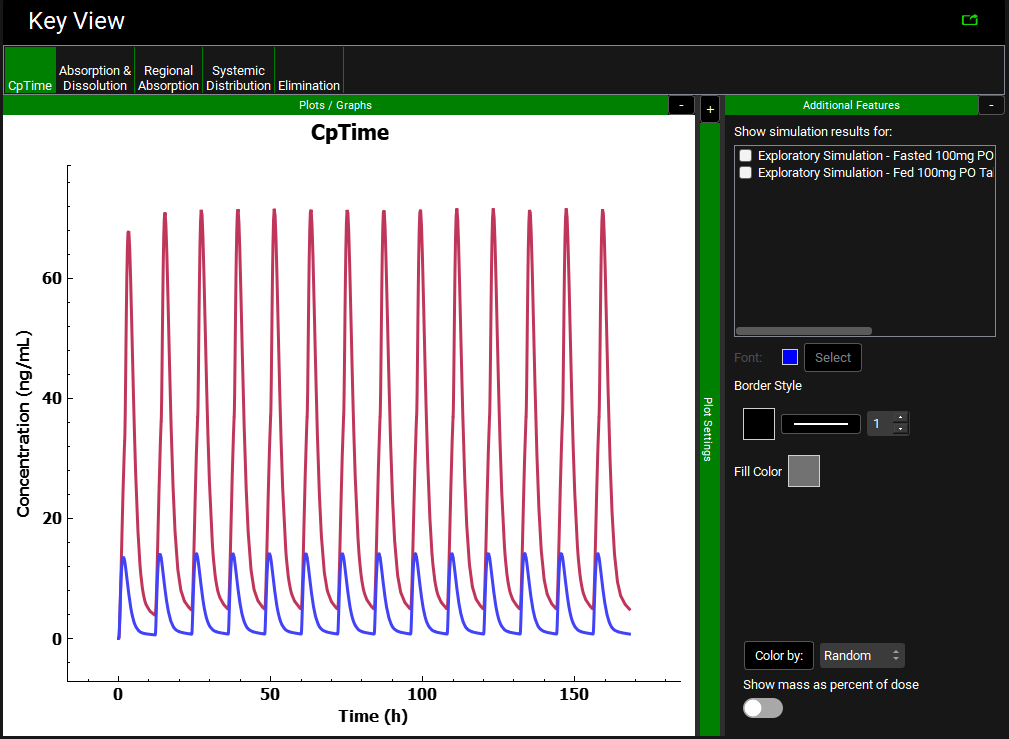
When the Simulation completes, the program will automatically switch to the Analysis view. Select the previously run simulation Fasted 100mg PO Tablet with meals from the Simulation list.
Expand the Additional Features pane by clicking on the “+”. Ensure Random is selected for the option to Color by and then click the Color by button. Observe how dosing in the Fed state delays the predicted Tmax and increases the predicted Cmax.