
GPX™ Reusability Tutorial: Asset Export and Import
This tutorial explores the ability to reuse assets from existing projects in your current project.
In this tutorial, we will cover:
Creating a new GPX™ project and adding a default compound
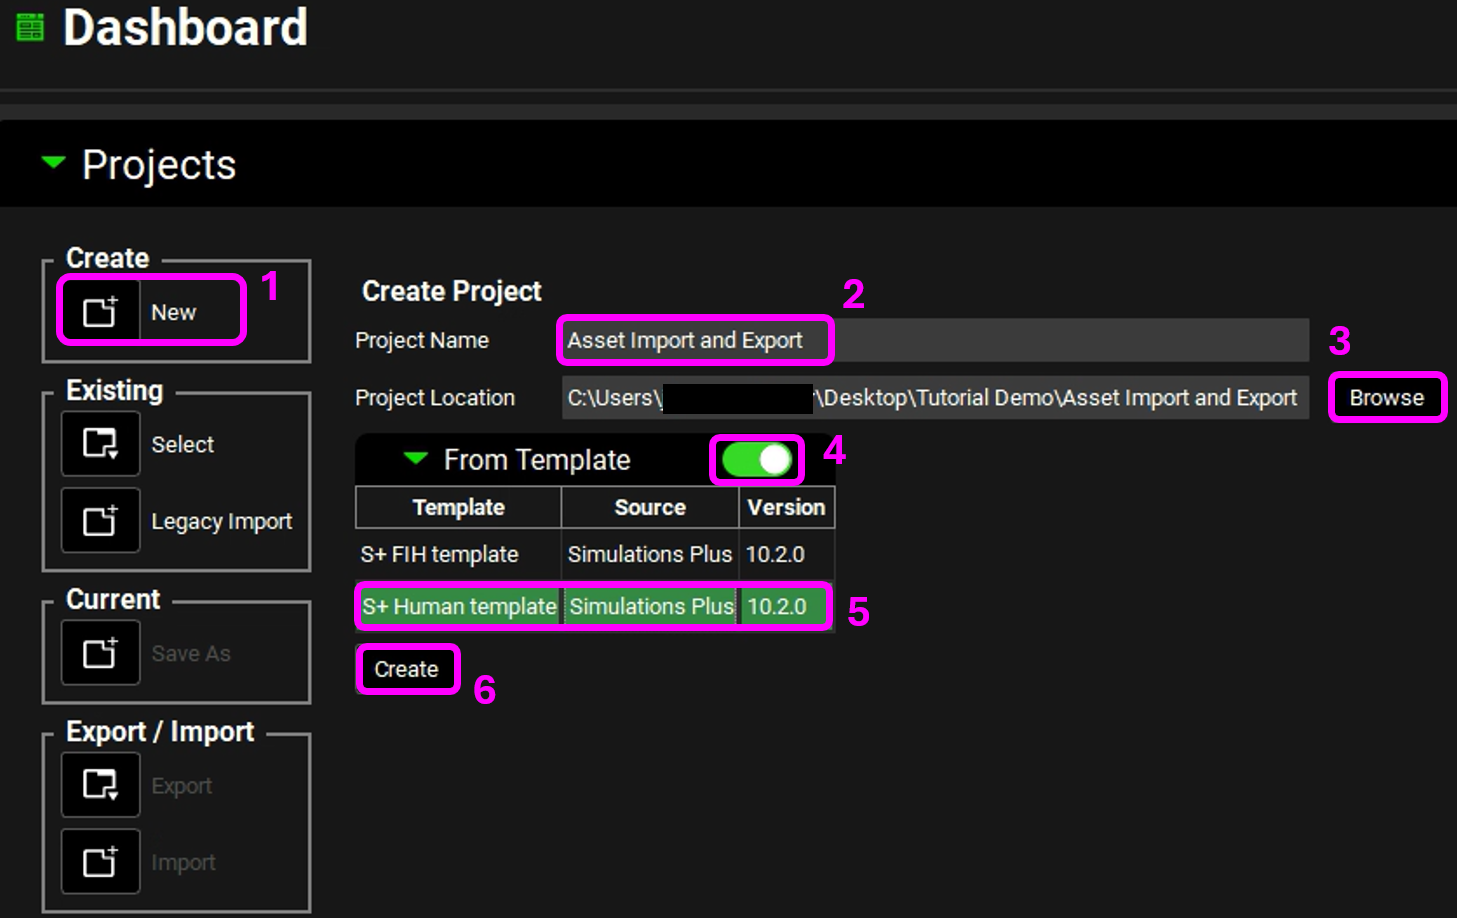
Open GPX™ and, in the Dashboard view, click on the icon next to New to create a new project.
Enter a Project Name, for example “Asset Import and Export”.
Click Browse to select the desired Project Location folder.
Click to turn on the toggle next to From Template.
Click on the template called S+ Human Template to select this to use.
Click Create.
The name of the project should now be visible in the top right corner of the program.
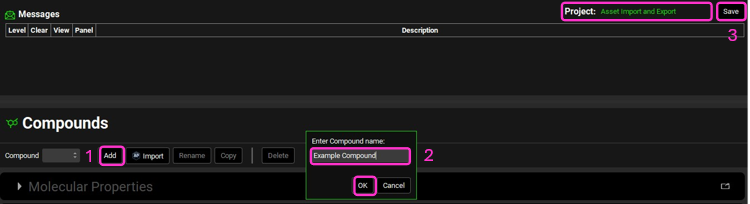
Navigate to the Compounds view.
Click Add and enter the name of the compound – we are going to use the default compound properties for this tutorial and so you can name the compound as “Example Compound”, then click OK (or press Enter).
Navigate to the Pharmacokinetics view and expand the Compartmental panel (by clicking on the green arrow or double clicking on the panel header bar). This pairs your compound with the displayed physiology.
Save the project and click OK (or press Enter).
NB – numbers reflect the order of the steps in the screenshot, rather than corresponding to the steps in the tutorial.
Importing a previously created Physiology Schedule into a new Project
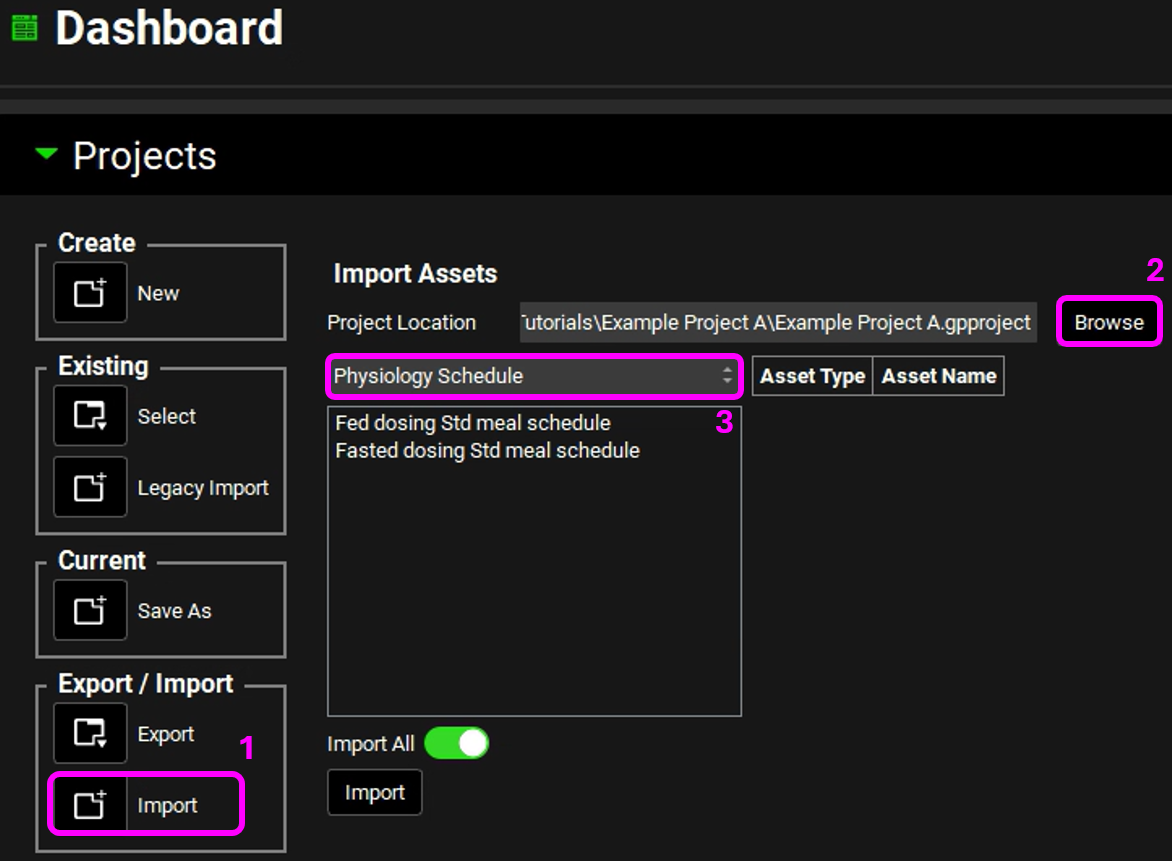
Navigate to the Dashboard.
Click on the icon next to Import.
Click Browse, navigate to the C:\Users\<user>\AppData\Local\Simulations Plus, Inc\GastroPlus\10.2\Tutorials\Example Project A and select the project file Example Project A.gpproject by clicking on it and clicking Open.
Click in the box displaying Compound to open the drop-down list and select Physiology Schedule by clicking on it.
NB – numbers reflect the order of the steps in the screenshot, rather than corresponding to the steps in the tutorial.
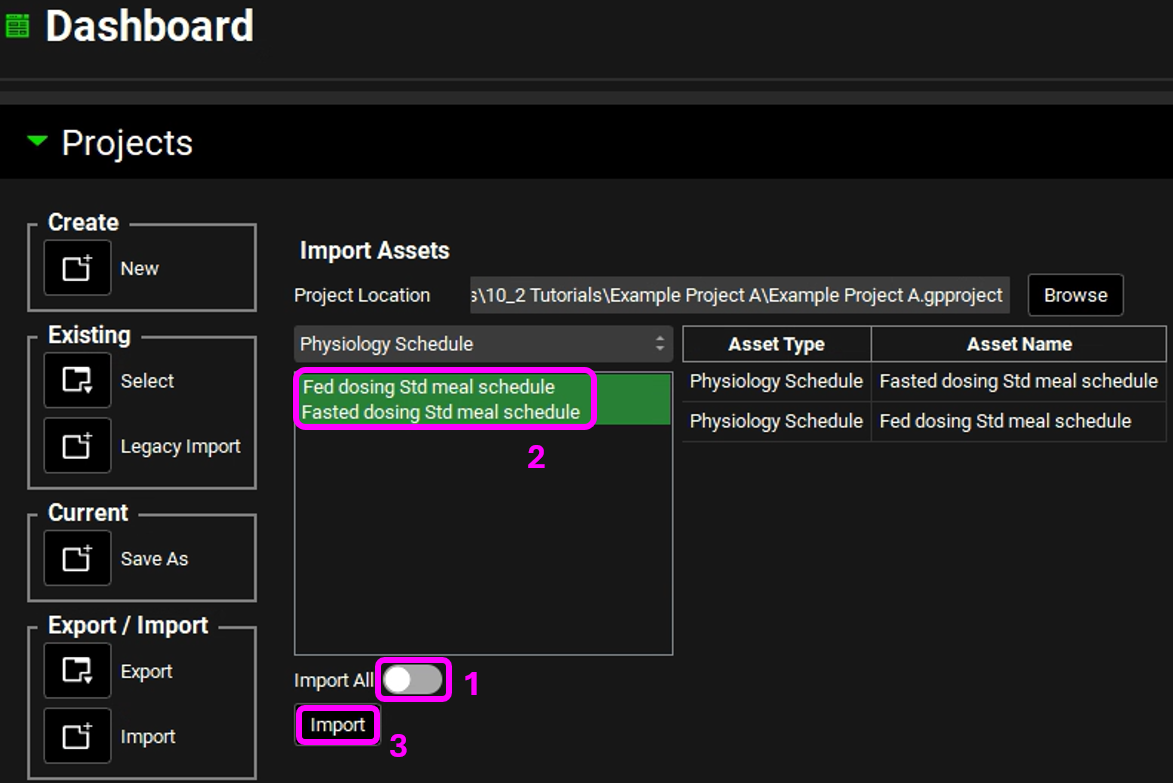
Check to ensure that the toggle next to Import All is off (the toggle should be grey, not green).
Click on both the Physiology Schedules that are displayed – the table on the right should populate with the Asset Type and Asset Name.
Click on Import then clear the information message that tells you Asset Import Completed by clicking OK.
NB – numbers reflect the order of the steps in the screenshot, rather than corresponding to the steps in the tutorial.
Navigate to the Physiology Schedules view and observe that the two Physiology Schedules we have just imported are now available.
Navigate to the Simulations view and click Add to enter a new Simulation. Name the Simulation “Fasted 100mg PO Tablet with meals” and click OK.
In the Drug Administration panel, check the assets that have been selected for the Compound and Dose Schedule before altering the Physiology Schedule to use “Fasted dosing Std meal schedule”.
The Physiomolecular Properties Selection box will come up. This allows you to tell the program which physiomolecular properties you want to use for each compound physiology pair. The box will come up for each of the Physiologies in the Physiology Schedule, so five times in total. Each time it appears, select the Human 85.53kg 30y physiology as shown in the screenshot below and click Select.
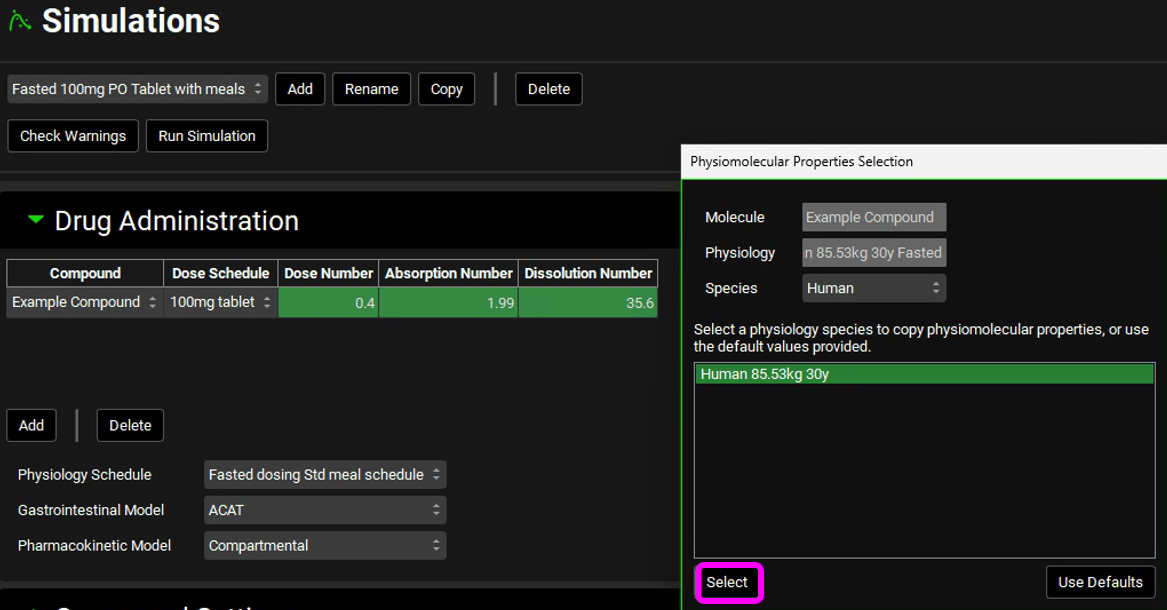
In the Compound Settings panel, click Estimate to calculate the Liver First Pass Extraction.
At the top of the interface, clear the message regarding the Physiology Schedule from the Message Center.
Repeat steps 9 to 13 to create a second Simulation called “Fed 100mg PO Tablet with meals” that uses the Physiology Schedule “Fed dosing Std meal schedule”. The Physiomolecular Properties Selection box will come up once this time, as there is only one additional Physiology used in this Physiology Schedule.
Save the Project.
Click Check Warnings and then click Run Simulation for each Simulation created.
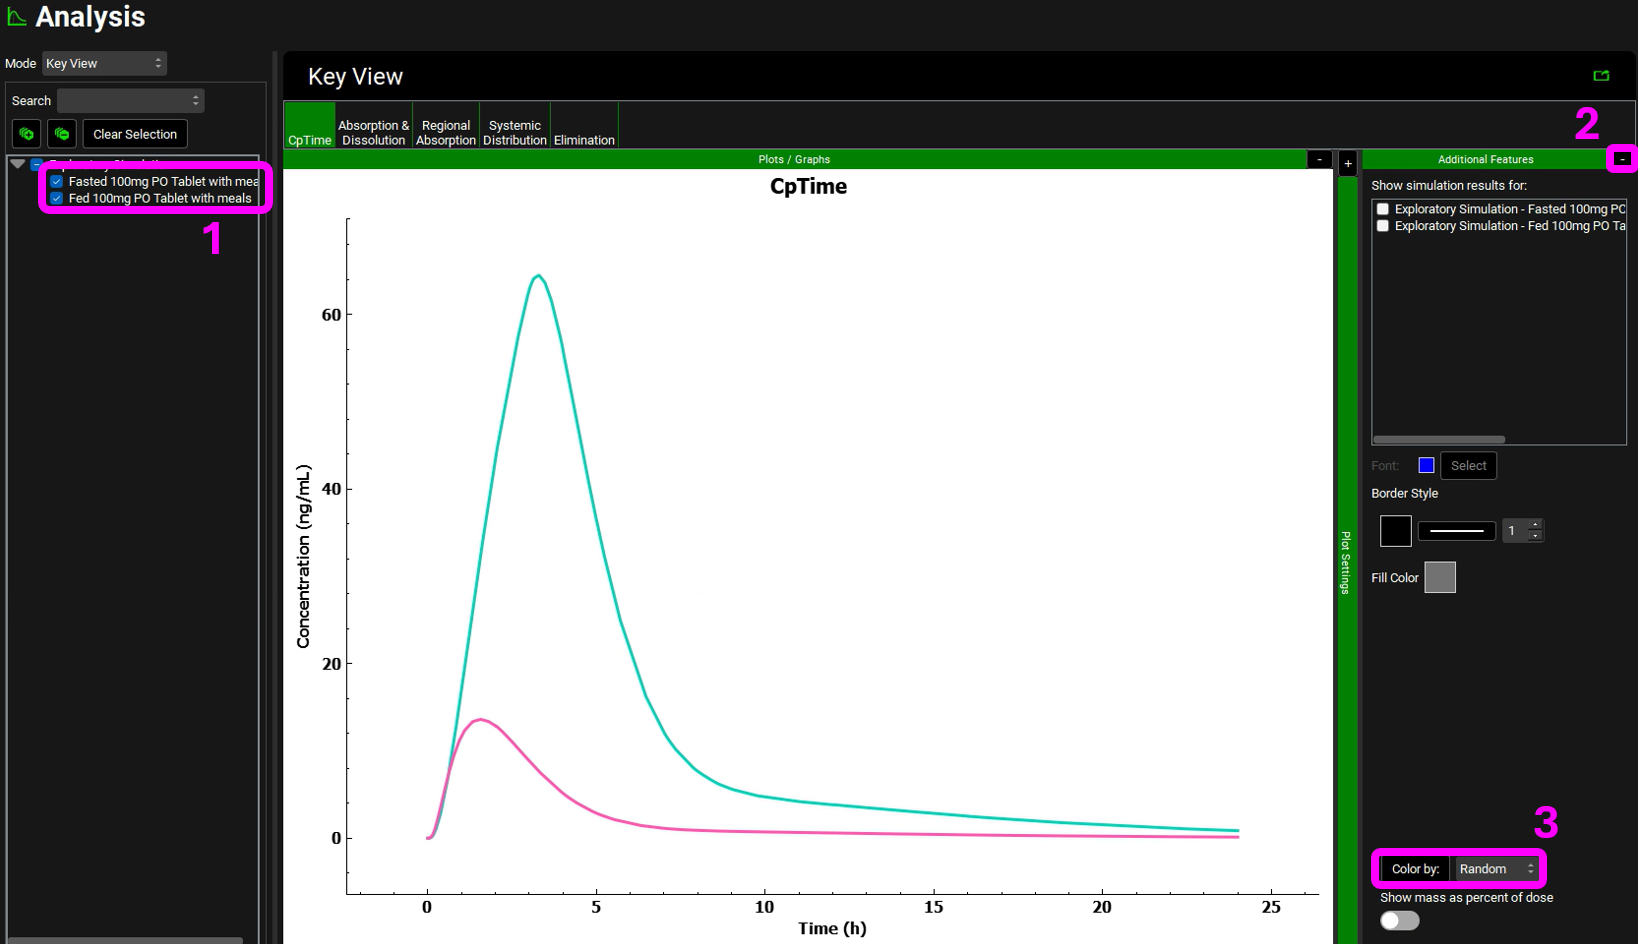
When each Simulation completes, the program will automatically switch to the Analysis view. Once both Simulations have been run, select the previously run Simulation from the Simulation list.
Expand the Additional Features pane by clicking on the “+”. Click on the box containing “Tissue” to activate the Color by drop-down list. Select “Random” and click the Color by: button to activate this setting in the plot (NB the colors you get may be different to the screenshot – repeatedly clicking the Color by: button cycles through different color options). To identify which curve represents which simulation, click the “-” next to Additional Features and expand the Plot Settings pane by clicking on the “+” then hover over the plot name to display the complete text.
Observe how dosing in the Fed state delays the predicted Tmax and increases the predicted Cmax.
NB – numbers reflect the order of the steps in the screenshot, rather than corresponding to the steps in the tutorial.
Exporting a previously created Compound
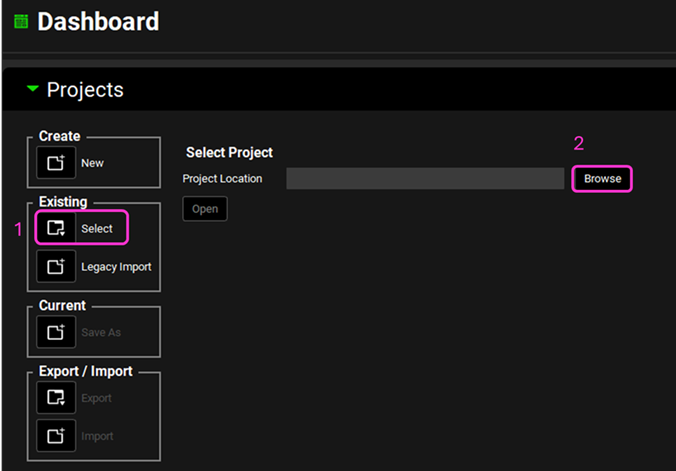
Navigate to the Dashboard view, click on the icon next to Select to open an Existing project.
Click Browse and navigate to the C:\Users\<user>\AppData\Local\Simulations Plus, Inc\GastroPlus\10.2\Tutorials\GPX Library and select the project file GPX Library.gpproject by clicking on it and clicking Open.
NB – numbers reflect the order of the steps in the screenshot, rather than corresponding to the steps in the tutorial.
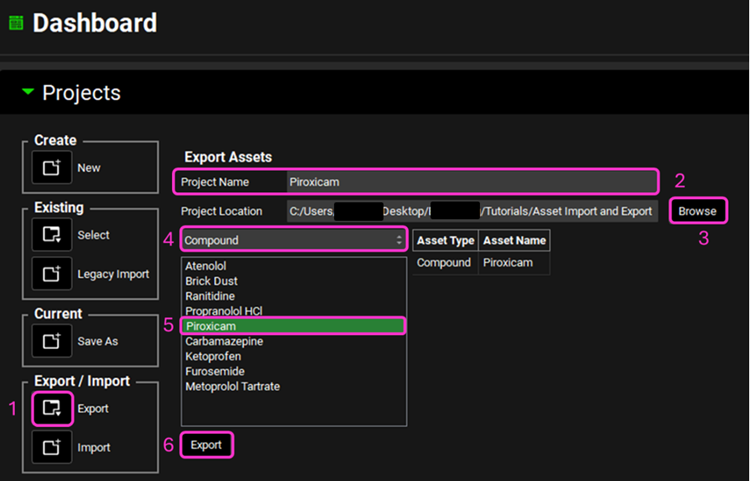
Click the icon next to Export.
Enter a Project Name by typing in the box called Project Name, for example “Piroxicam”, and select a file location by using the Browse button.
The asset type defaults to Compound so we can go ahead and select Piroxicam from the list. There is also the option to export a Physiology, Formulation, Dosing Schedule, Physiology Schedule, Simulation, Run, Pharmacokinetic Parameters or Profiles and all these can be accessed by clicking in the box that says Compound to activate the drop-down list.
Click Export.
Click OK on the Asset Export Completed message.
NB – numbers reflect the order of the steps in the screenshot, rather than corresponding to the steps in the tutorial.
Click on the icon next to Select to open an Existing project.
Click Browse and navigate to the folder where the Piroxicam project was saved, select the Piroxicam.gpproject and click Open.
A message will appear to ask you to confirm that any changes to the current project have been saved – click Yes to continue.
Move through the views on the navigation pane from Compounds to Simulations, observing the information that has been entered in this project. As we selected to export only the Compound there is simply a Compound and the associated Physiology and Pharmacokinetics. This can now be imported into another project, or additional assets can be added to this one to enable a Simulation to be run. To export a ready-made Simulation, select Simulation as the asset type and the Simulation that includes the compound of interest.