
Tutorial: Legacy Import of Historical GastroPlus databases
In this tutorial, we will cover:
Opening a Legacy Database in GPX™
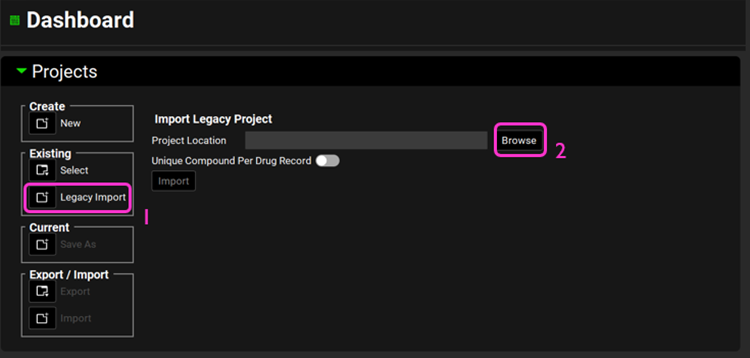
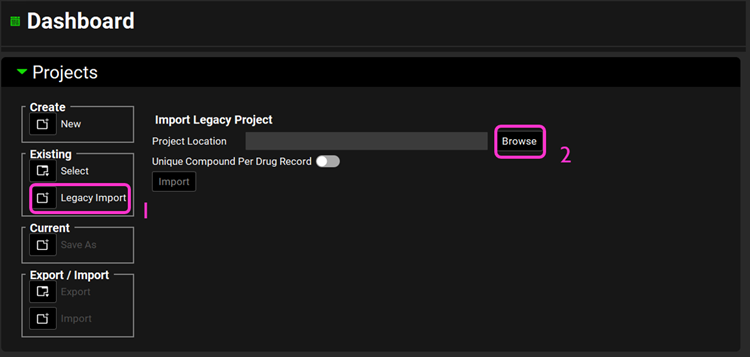
Open GPX™ and, in the Dashboard view, click on the icon next to Legacy Import under Existing to import a legacy database.
Note that there is a toggle option to use a Unique Compound Per Drug Record.
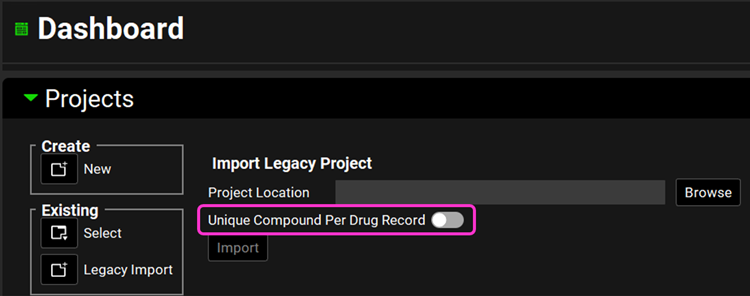
When importing a database that has drug records containing the exact same compound GPX™ will create only one reusable compound asset if the toggle is off. If the toggle is on, GPX™ will create one compound per drug record and name it after the drug record name in the legacy database.
For example, a database contains three drug records named after the three different formulations: Formulation A, Formulation B, and Formulation C. All three records have the exact same compound. If the toggle is off, then only one compound asset (Compound 1) will be created. If the toggle is on, then three compound assets will be created: Formulation A, Formulation B, and Formulation C.
In this tutorial we will be importing a database that has five drug records with five different compounds. Therefore, the Unique Compound Per Drug Record toggle can be left off.
Click Browse and navigate to the C:\Users\<user>\AppData\Local\Simulations Plus, Inc\GastroPlus\10.2\Tutorial folder\LegacyImportDatabase and select the GastroPlus® database “Legacy import” (*.mdb) by clicking on it and clicking open.
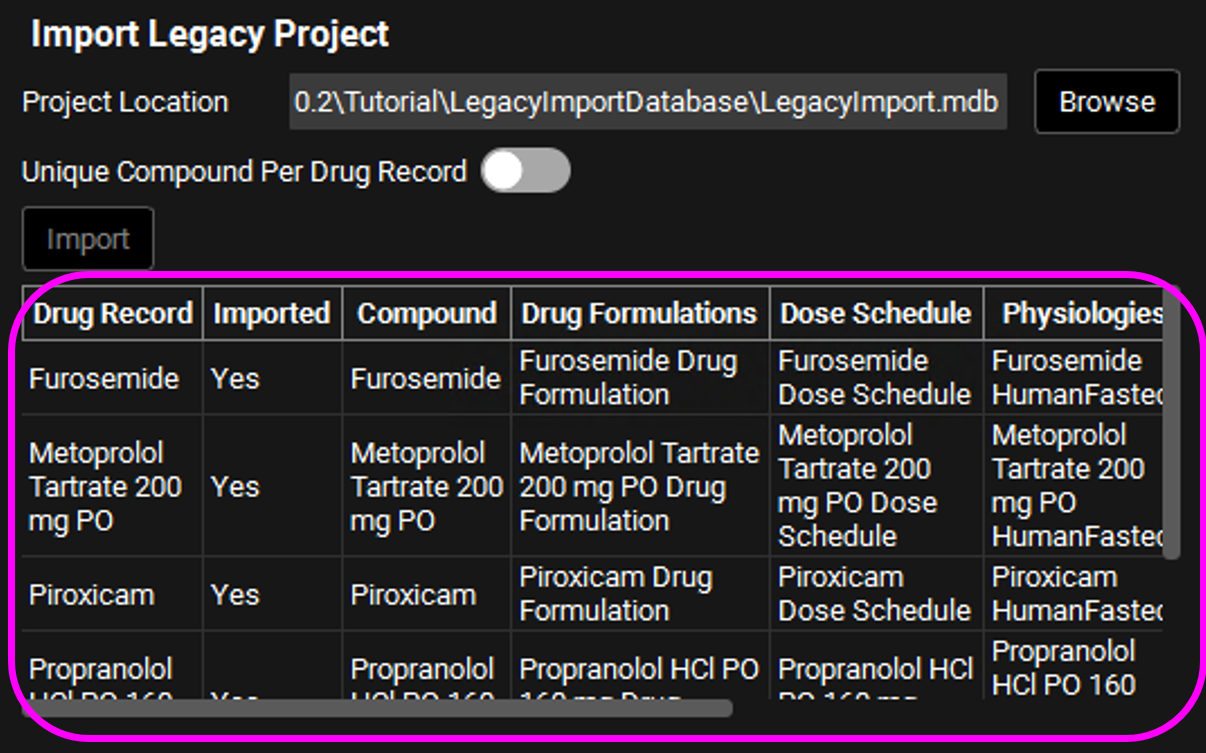
The Drug Records for all the compounds/drugs in the imported project are tabulated below the Import button. The summary table displays the following information for each drug record in the imported database: Drug Record, Imported (this is how you know if the import was successful), Compound, Drug Formulations, Dose Schedule, Physiologies, Physiology Schedule and Simulation. Each asset is named after the drug record + asset name, e.g.: Furosemide Drug Formulation.
All components on the GPX™ main window are now enabled.
The summary table is only displayed the first time the legacy import of that database is done. If you reopen the created project the table will no longer be displayed in the Dashboard view.
The summary table is a static table, that is, it will not reflect any changes you make after importing the legacy database.
After a legacy import is done, a .csv file (DatabaseName_LegacyImport Summary.csv) is created containing the legacy import summary information, located in the same folder as the database. In this tutorial, the .csv file will be located in the C:\Users\<user>\AppData\Local\Simulations Plus, Inc\GastroPlus\10.2\Tutorial\LegacyImportDatabase folder.
Move through the views on the navigation pane from Observed Data to Simulations, observing the information that has been created based on the legacy database.
The support files used in your database (e.g.: .opd, .dsd, .cat, .pbk…) must be in the same folder in order to be successfully imported and linked to the appropriate asset / simulation.
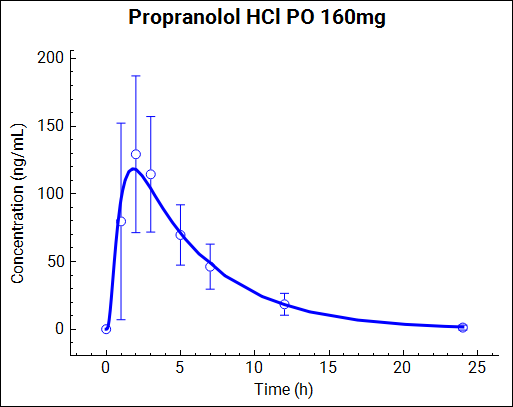
Run a simulation and notice that they match between GPX™ and the legacy platform.
Renaming assets
In this tutorial we will do a Legacy Import of a historical database and rename the assets to convert the project into the GPX™ Paradigm. If at any given time the “Physiomolecular Properties Selection” dialog box opens, proceed to step 22 for instructions.
Open GPX™ and, in the Dashboard view, click on the icon next to Legacy Import under Existing to import a legacy database.
In this tutorial we will be importing a database that has five drug records with five different compounds. Therefore, the Unique Compound Per Drug Record toggle can be left off.
Click Browse and navigate to the C:\Users\<user>\AppData\Local\Simulations Plus, Inc\GastroPlus\10.1\Tutorial folder and select the GastroPlus® database “Legacy import” (*.mdb) by clicking on it and clicking open.
You do not need to import the legacy database again if you have already done the previous section of this tutorial. Doing so will overwrite what has been done there.
The Drug Records for all the compounds/drugs in the imported project are tabulated below the Import button. The Drug Records table displays the following information for each compound in the imported database: Drug Record, Imported (this is how you know if the import was successful), Compound, Drug Formulations, Dose Schedule, Physiologies, Physiology Schedule and Simulation. Each asset is named after the drug record + asset name. All components on the GPX™ main window are now enabled.
Now we will convert the imported database to the GPX™ paradigm.
Open the Observed Data view on the navigation pane. Expand the Profiles panel and the Summary of Data Profiles sub-panel if not already expanded. Note that this project has three Exposure Data profiles and two Solubility profiles. We will rename each data profile according to the table below:
Legacy Import Name | Rename |
Piroxicam Exposure Group | Piroxicam |
Metoprolol Tartrate 200 mg PO Exposure Group | Metoprolol Tartrate 200 mg PO |
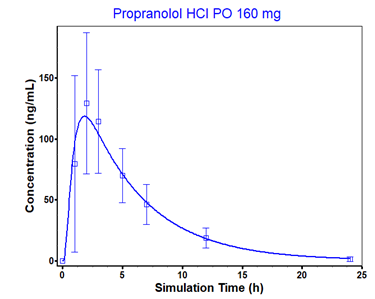
Propranolol HCl PO 160 mg Exposure Group | Propranolol HCl PO 160 mg |
Piroxicam Solubility Group | Piroxicam |
Propranolol HCl PO 160 mg Solubility Group | Propranolol HCl |
In the Profiles panel, select Exposure Data (if not already selected) from the Data Type drop-down. Click on Rename and delete “Exposure Group” from each Group Name and click OK.
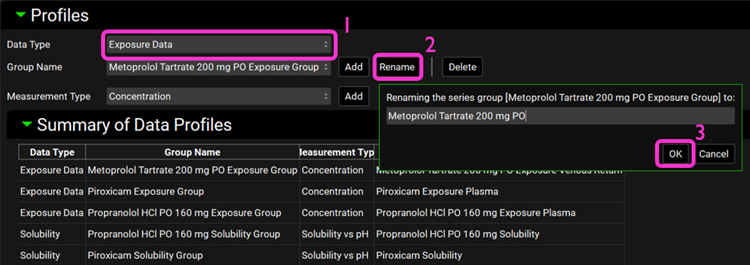
Switch the Data Type to Solubility and rename the two profiles according to table in step 5.
Open the Compounds view on the navigation pane. Click on the Compound drop-down menu and note that only two compound assets (Propranolol HCl PO 160mg and Metoprolol Tartrate 200mg PO) need renaming since their name contains information on the dose and route of administration.
Select the Propranolol HCl PO 160mg compound and click on Rename. Delete “PO 160mg” and click OK.
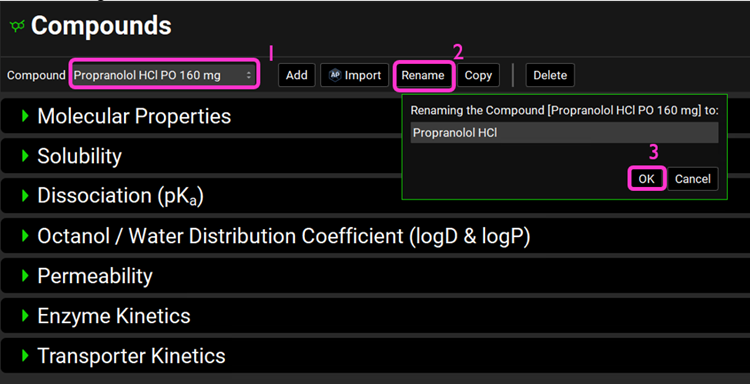
Do the same for Metoprolol Tartrate 200mg PO and delete “200mg PO” from the compound name.
Move through the panels on the Compounds view observing the information that has been imported in this project.
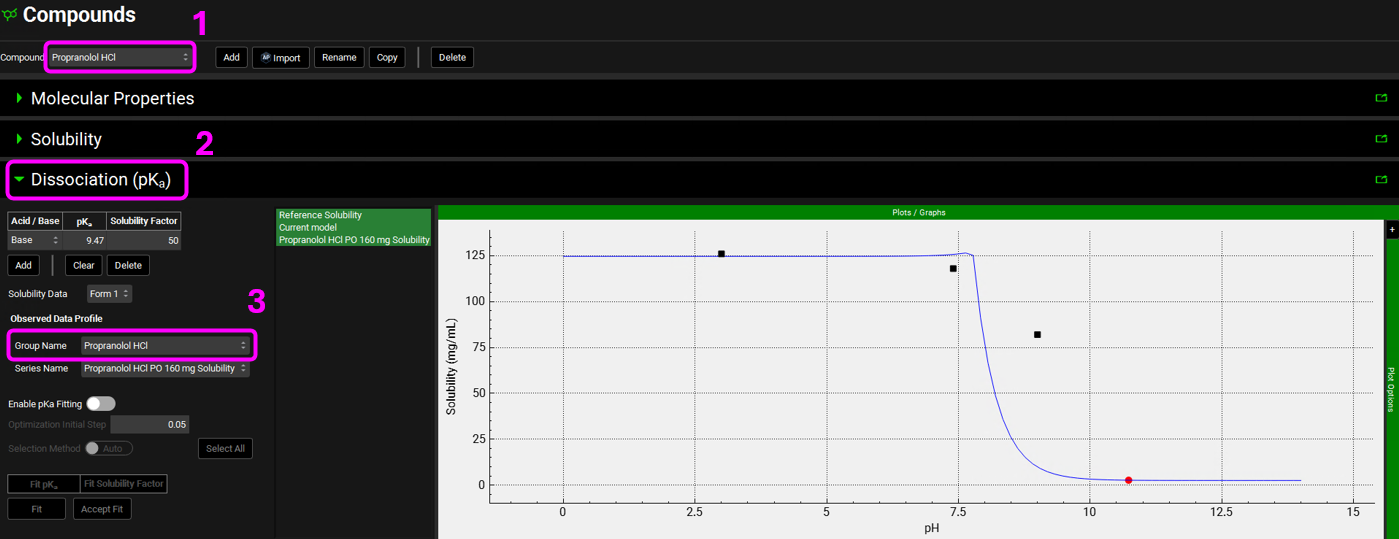
In the Compounds view, select Propranolol HCl from the Compound drop-down. Expand the Dissociation (pKa) panel by double-clicking on the panel or clicking on the green arrow. In order to compare the Solubility curve to the observed solubility, you will need to select it from the Observed Data Profile, under the Group Name drop-down.
We will do the same for Piroxicam. With the Dissociation (pKa) panel open, switch the compound to Piroxicam and select the Piroxicam solubility data in the Group Name drop-down, under the Observed Data profile. To enhance the plot display, set y-axis to log scale by expanding Plot Options and selecting Logarithmic for Dependent Axis.

Save the project.
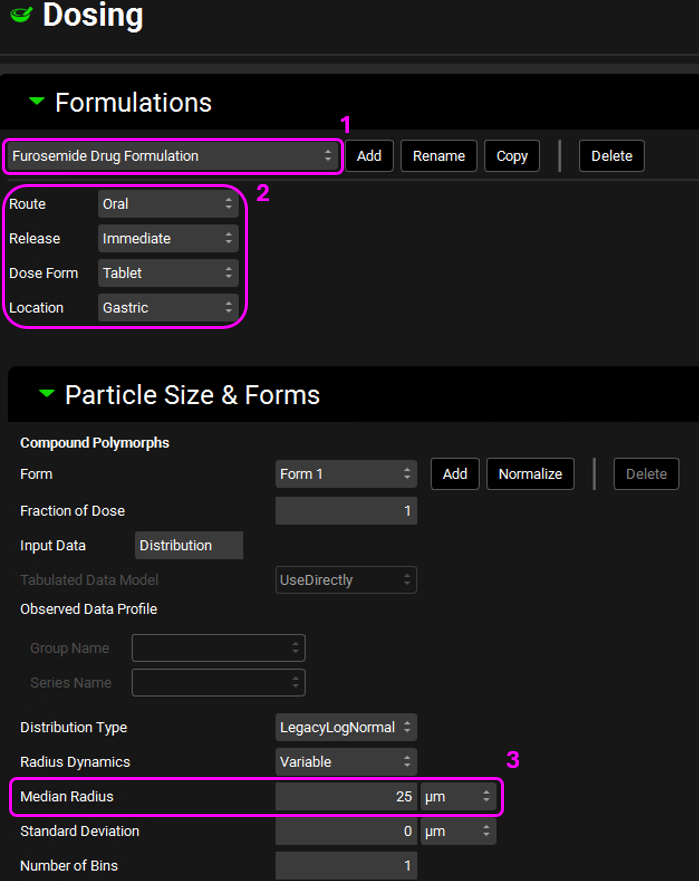
Open the Dosing view and expand the Formulations panel by double-clicking on the panel or clicking on the green arrow. Expand the Particle Size & Forms sub-panel as well.
Open each formulation from the interface menu and note that the Furosemide, Metoprolol Tartrate 200 mg PO, Propranolol HCl PO 160 mg, and Ranitidine Drug Formulation are all the same formulation:
Route: Oral
Release: Immediate
Dose Form: Tablet
Location: Gastric
Median Radius: 25μm
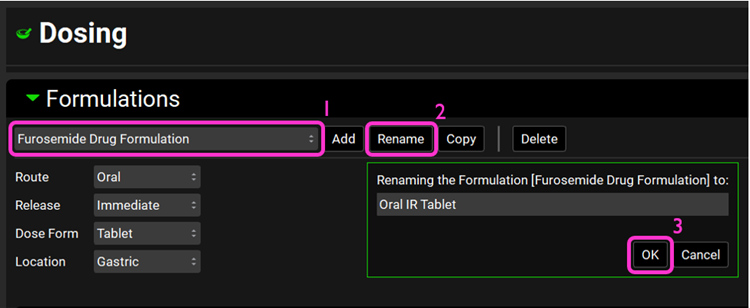
Since they are all the same formulation, we only need one formulation asset for them. Rename the Furosemide Drug Formulation asset to Oral IR Tablet by clicking on Rename. Once renamed, click on OK.
Switch the formulation to Piroxicam Drug Formulation. Rename the formulation to Oral IR Capsule.
Open the Dosing Schedules panel. We will now rename each Dosing Schedule and switch the formulation when applicable.
The renaming of formulations for Furosemide and Piroxicam in the previous step does not alter the link to their respective dosing schedule. The formulation in the Furosemide and Piroxicam dosing schedules will be Oral IR Tablet and Oral IR Capsule, respectively.
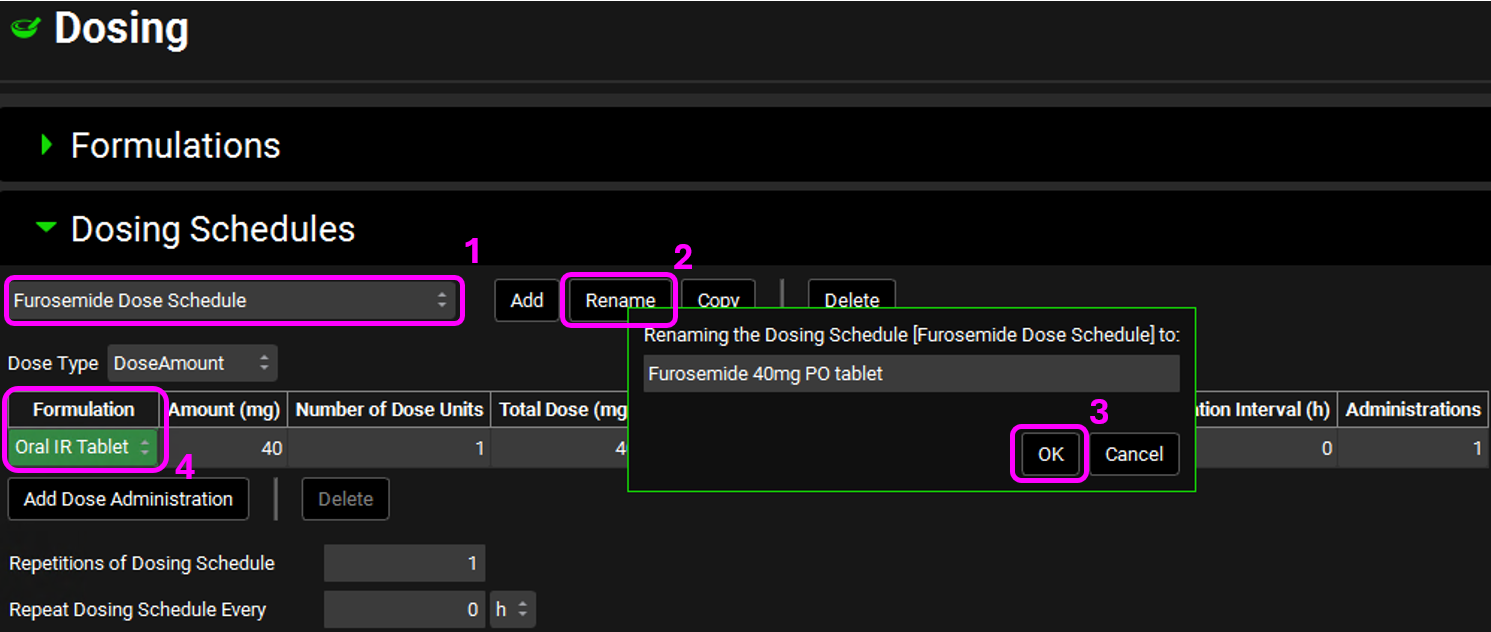
Click on Rename next to the Dosing Schedule name and rename it according to the table below, then click on OK. After renaming, click on the Formulation drop-down and select Oral IR Tablet for all dosing schedules except for Piroxicam.
Legacy Import Name | Rename | Formulation |
Furosemide Dose Schedule | Furosemide 40mg PO tablet | Oral IR Tablet |
Metoprolol Tartrate 200 mg PO Dose Schedule | Metoprolol Tartrate 200 mg PO tablet | Oral IR Tablet |
Piroxicam Dose Schedule | Piroxicam 20 mg PO capsule | Oral IR Capsule |
Propranolol HCl PO 160 mg Dose Schedule | Propranolol HCl 160 mg PO tablet | Oral IR Tablet |
Ranitidine Dose Schedule | Ranitidine 150mg PO tablet | Oral IR Tablet |
Since this project has five different compounds, we will keep the drug’s name in the Dosing Schedule to avoid confusion. But keep in mind that the dosing schedule is a reusable asset and is not tied to a compound.
Save the project.
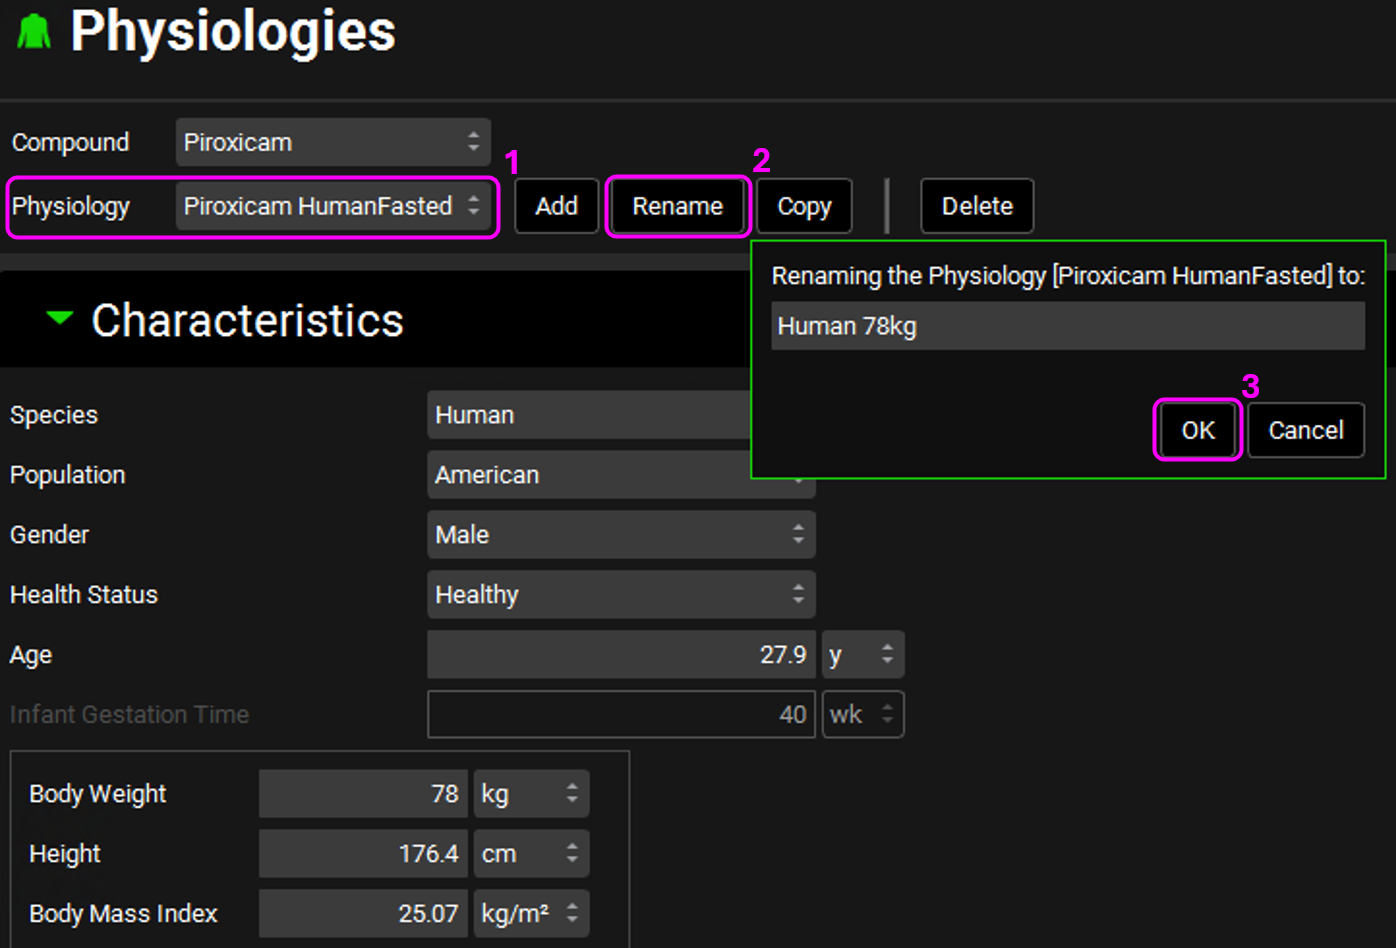
Open the Physiologies view and select each physiology from the Physiology drop-down. Note that Propranolol, Ranitidine and Piroxicam all have the same physiology:
Species: Human
Population: American
Gender: Male
Health Status: Healthy
Age: 27.9y
Body Weight: 78kg
Since they all have the same physiology, we only need one physiology asset (and one physiology schedule, see step 19 below) for them. Rename the Piroxicam HumanFasted physiology asset to Human 78kg by clicking on Rename. Once renamed, click on OK.
Rename the Furosemide HumanFasted physiology to Human 70kg and Metoprolol Tartrate 200 mg PO HumanFasted to Human 66kg.
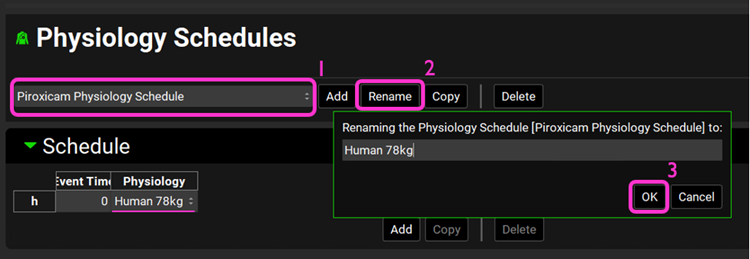
Open the Physiology Schedules view. Select the Piroxicam Physiology Schedule and note the renamed physiology is displayed under the Schedule panel.
Click on Rename, rename the schedule to Human 78kg, and click on OK.
Similarly, rename the Furosemide Physiology Schedule physiology to Human 70kg and Metoprolol Tartrate 200 mg PO Physiology Schedule to Human 66kg.
Save the project.
Open the Simulations view. Move through the simulations and note how the renamed assets, for example in the Piroxicam Simulation, show up in the Drug Administration and Compound Settings panels.
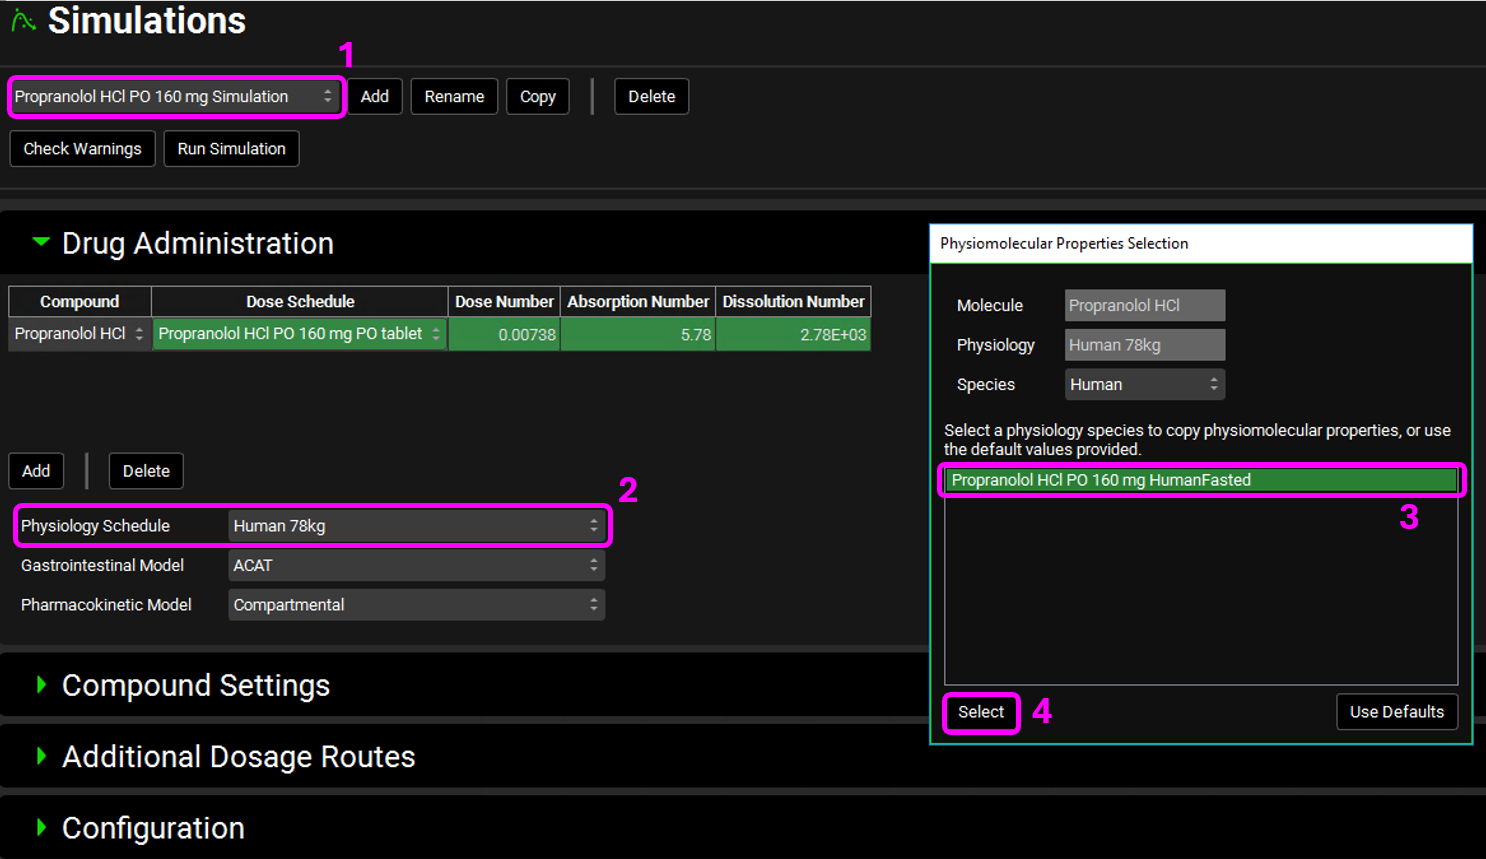
Select the Propranolol HCl PO 160 mg Simulation from the simulation drop-down menu. In the Drug Administration pane, select Human 78kg from the Physiology Schedule drop-down. The Physiomolecular Properties Selection dialog box will open. We will use the same physiomolecular properties (Rbp and Fup) for Propranolol. Make sure the “Propranolol HCl PO 160 mg HumanFasted” physiology is selected and click on Select.
Repeat this step for Ranitidine and select the Ranitidine HumanFasted physiology in the Physiomolecular Properties Selection dialog box.
A message will appear in the Messages center at the top of the interface warning you that the Physiology schedule was changed in the simulation. Click on Done to dismiss the warning message.
Save the project.
Now we are ready to delete the imported assets that are no longer needed.
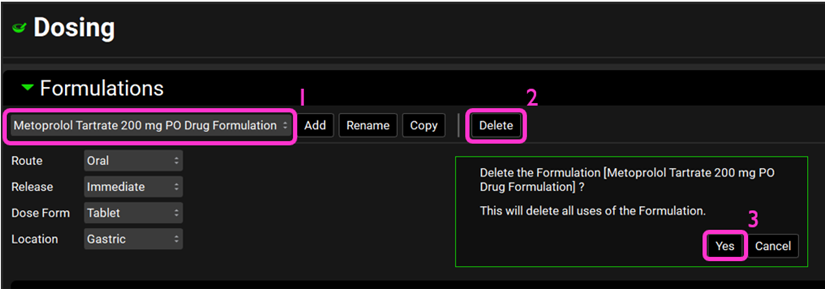
Open the Dosing view and open the Formulations panel.
Delete the formulations Metoprolol Tartrate 200 mg PO Drug Formulation, Propranolol HCl PO 160 mg Drug Formulation and Ranitidine Drug Formulation by selecting it form the Formulations drop-down and clicking on Delete. Click Yes on the message about deleting the formulation.
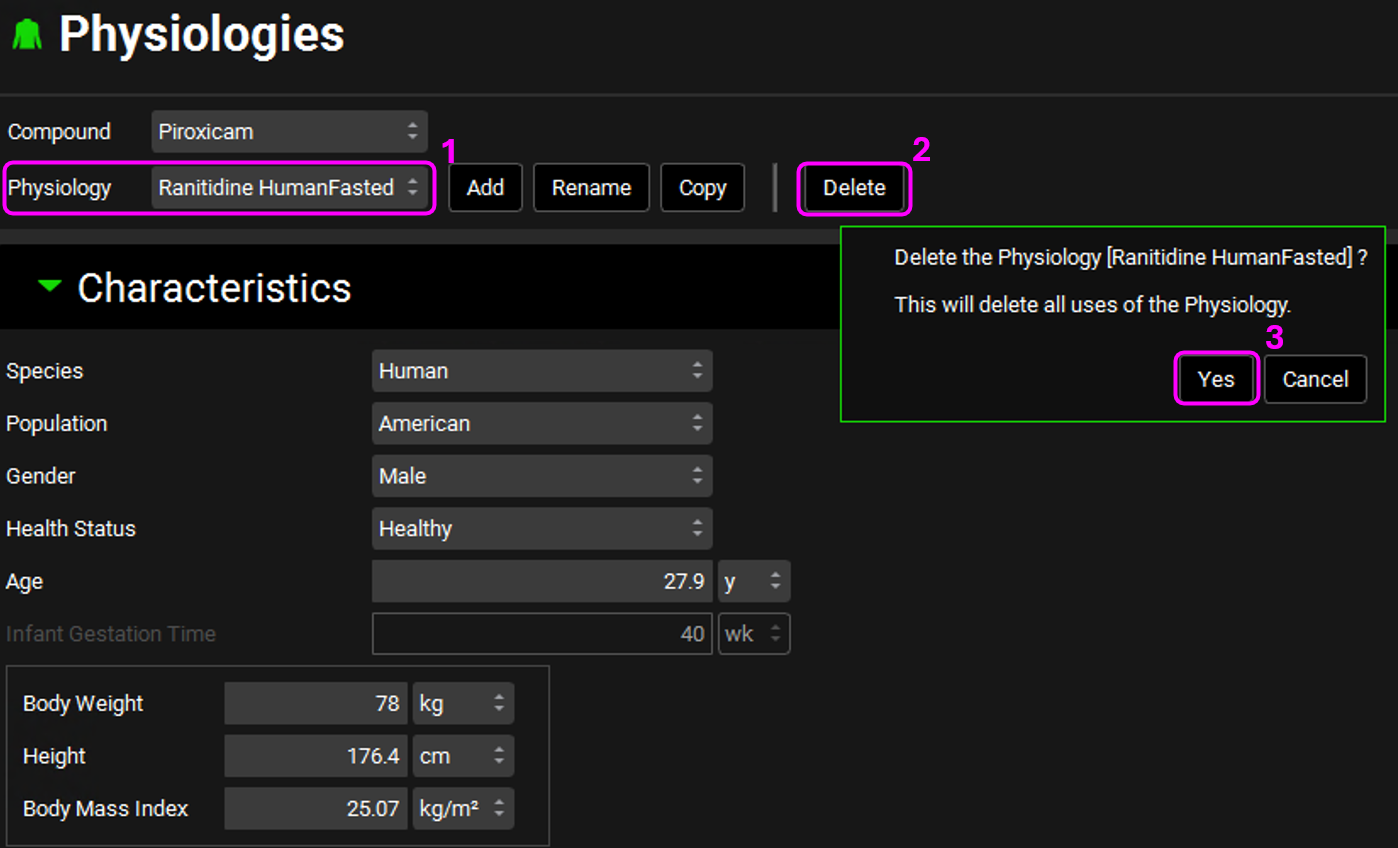
Open the Physiologies view. Delete the Propranolol HCl PO 160 mg HumanFasted and the Ranitidine HumanFasted physiologies by selecting it from the Physiology drop-down and clicking on Delete. Click Yes on the message about deleting the physiology.
The Physiology Schedules tied to those physiologies are automatically deleted.
Save the project.
Open the Simulations view and run the Propranolol HCL PO 160mg simulation again and notice that the results remain the same.
The Legacy Import project has now been converted to the GPX™ paradigm.
Although projects created in older versions of GastroPlus® are able to be opened in GPX™, it is not possible to open new projects (created in GPX™) with older versions of GastroPlus®. When you upgrade a project with the new version, a copy of the old project will be saved in the same folder, which should be opened with the older version.